Mocha 是一个功能丰富的 JavaScript 测试框架,运行在 Node.js 和浏览器中,使异步测试变得简单而有趣。Mocha 测试串行运行,允许灵活、准确的报告,同时将未捕获的异常映射到正确的测试用例。托管于 GitHub。
¥Mocha is a feature-rich JavaScript test framework running on Node.js and in the browser, making asynchronous testing simple and fun. Mocha tests run serially, allowing for flexible and accurate reporting, while mapping uncaught exceptions to the correct test cases. Hosted on GitHub.
# 特性
¥Features
# 目录
¥Table of Contents
- 目录
- 安装
- 入门
- 运行周期概述
- 检测到对
done()的多个调用 - 断言
- 异步代码
- 同步代码
- 箭头函数
- 钩子
- 待定测试
- 独家测试
- 包容性测试
- 重试测试
- 动态生成测试
- 超时
- 差异
- 命令行用法
- 并行测试
- 根钩子插件
- 全局夹具
- 测试夹具决策树向导事物
- 接口
- 报告器
- Node.JS 原生 ESM 支持
- 在浏览器中运行 Mocha
- 配置 Mocha (Node.js)
test/目录- 错误代码
- 编辑器插件
- 示例
- 测试 Mocha
- 更多信息
# 安装
¥Installation
使用 npm 进行全局安装:
¥Install with npm globally:
$ npm install --global mocha
或作为项目的开发依赖:
¥or as a development dependency for your project:
$ npm install --save-dev mocha
从 v11.0.0 开始,Mocha 要求 Node.js
^18.18.0 || ^20.9.0 || >=21.1.0。¥As of v11.0.0, Mocha requires Node.js
^18.18.0 || ^20.9.0 || >=21.1.0.
# 入门
¥Getting Started
$ npm install mocha
$ mkdir test
$ $EDITOR test/test.js # or open with your favorite editor
在你的编辑器中:
¥In your editor:
var assert = require('assert');
describe('Array', function () {
  describe('#indexOf()', function () {
    it('should return -1 when the value is not present', function () {
      assert.equal([1, 2, 3].indexOf(4), -1);
    });
  });
});
返回终端:
¥Back in the terminal:
$ ./node_modules/mocha/bin/mocha.js

  Array
    #indexOf()
      ✓ should return -1 when the value is not present


  1 passing (9ms)
在 package.json 中设置测试脚本:
¥Set up a test script in package.json:
"scripts": {
  "test": "mocha"
}
然后运行测试:
¥Then run tests with:
$ npm test
# 运行周期概述
¥Run Cycle Overview
更新为 v8.0.0。
¥Updated for v8.0.0.
以下是 Mocha 的 “执行流程” 在 Node.js 中运行时的中层概要;“不太重要” 的详细信息已被省略。
¥The following is a mid-level outline of Mocha’s “flow of execution” when run in Node.js; the “less important” details have been omitted.
在浏览器中,测试文件由 <script> 标签加载,调用 mocha.run() 从 以下 步骤 9 开始。
¥In a browser, test files are loaded by <script> tags, and calling mocha.run() begins at step 9 below.
# 串行模式
¥Serial Mode
-
用户(就是你)执行
mocha¥User (that’s you) executes
mocha -
从配置文件加载选项(如果存在)
¥Loads options from config files, if present
-
Mocha 处理提供的任何命令行选项(有关详细信息,请参阅 配置合并 部分)
¥Mocha processes any command-line options provided (see section on configuration merging for details)
-
如果找到
node可执行文件的已知标志:¥If known flags for the
nodeexecutable are found:-
Mocha 将在子进程中生成
node,并使用这些标志执行自身¥Mocha will spawn
nodein a child process, executing itself with these flags -
否则,Mocha 不会生成子进程
¥Otherwise, Mocha does not spawn a child process
-
-
Mocha 加载
--require指定的模块¥Mocha loads modules specified by
--require-
如果以这种方式加载的文件包含已知的 Mocha 特定导出(例如 根钩子插件)、Mocha “registers” 这些
¥If a file loaded this way contains known Mocha-specific exports (e.g., root hook plugins), Mocha “registers” these
-
如果没有,Mocha 会忽略
--require’d 模块的任何导出¥If not, Mocha ignores any exports of a
--require’d module
-
-
Mocha 验证通过
--require或其他方式加载的任何自定义报告器或接口¥Mocha validates any custom reporters or interfaces which were loaded via
--requireor otherwise -
Mocha 发现测试文件;当没有给出文件或目录时,它会在
test目录中查找扩展名为.js、.mjs或.cjs的文件(但不是其子目录),相对于当前工作目录¥Mocha discovers test files; when given no files or directories, it finds files with extensions
.js,.mjsor.cjsin thetestdirectory (but not its children), relative to the current working directory -
(默认)bdd 接口 以无特定顺序加载测试文件,这些文件被赋予特定于接口的
global上下文(这就是describe()最终作为测试文件中的全局变量的方式)¥The (default) bdd interface loads the test files in no particular order, which are given an interface-specific
globalcontext (this is how, e.g.,describe()ends up as a global in a test file)-
当加载测试文件时,Mocha 会执行其所有套件并查找(但不执行)其中的任何钩子和测试。
¥When a test file is loaded, Mocha executes all of its suites and finds–but does not execute–any hooks and tests therein.
-
顶层钩子、测试和套件都是 “invisible” 根套件的成员;整个过程只有一个根套件
¥Top-level hooks, tests and suites are all made members of an “invisible” root suite; there is only one root suite for the entire process
-
-
Mocha 运行 全局设置夹具(如果有)
¥Mocha runs global setup fixtures, if any
-
从 “root” 套件开始,Mocha 执行:
¥Starting with the “root” suite, Mocha executes:
-
任何 “首先” 钩子(对于根套件,这只发生一次;请参阅 根钩子插件)
¥Any “before all” hooks (for the root suite, this only happens once; see root hook plugins)
-
对于每个测试,Mocha 都会执行:
¥For each test, Mocha executes:
-
任何 “在每个之前” 钩子
¥Any “before each” hooks
-
测试(并报告结果)
¥The test (and reports the result)
-
任何 “每个之后” 钩子
¥Any “after each” hooks
-
-
如果当前套件有子套件,请重复 10 中的步骤。每个子套件;每个子套件继承其父套件中定义的任何 “在每个之前” 和 “每个之后” 钩子
¥If the current suite has a child suite, repeat the steps in 10. for each child suite; each child suite inherits any “before each” and “after each” hooks defined in its parent
-
任何 “毕竟” 钩子(对于根套件,这只发生一次;请参阅 根钩子插件)
¥Any “after all” hooks (for the root suite, this only happens once; see root hook plugins)
-
Mocha 打印最终摘要/结语(如果适用)
¥Mocha prints a final summary/epilog, if applicable
-
Mocha 运行 全局拆解夹具(如果有)
¥Mocha runs global teardown fixtures, if any
# 并行模式
¥Parallel Mode
-
重复上述 串行模式 中的步骤 1 到 6,跳过报告者验证
¥Repeat steps 1 through 6 from Serial Mode above, skipping reporter validation
-
所有找到的测试文件都放入队列中(它们不由主进程加载)
¥All test files found are put into a queue (they are not loaded by the main process)
-
Mocha 运行 全局设置夹具(如果有)
¥Mocha runs global setup fixtures, if any
-
Mocha 创建子进程池 (“workers”)
¥Mocha creates a pool of subprocesses (“workers”)
-
在工作线程运行它收到的第一个测试之前,工作线程 “bootstraps” 本身会执行以下操作:
¥Immediately before a worker runs the first test it receives, the worker “bootstraps” itself by:
-
加载所有
--require’d 模块¥Loading all
--require’d modules -
注册任何 root hook 插件
¥Registering any root hook plugins
-
忽略全局夹具和自定义报告器
¥Ignoring global fixtures and custom reporters
-
断言内置或自定义接口有效
¥Asserting the built-in or custom interface is valid
-
-
当工作线程收到要运行的测试文件时,工作线程会为单个测试文件创建一个新的 Mocha 实例,并且:
¥When a worker receives a test file to run, the worker creates a new Mocha instance for the single test file, and:
-
工作线程重复 above 中的步骤 8
¥The worker repeats step 8 from above
-
工作线程从 above 开始重复步骤 10,但需要注意的是,工作线程不直接报告测试结果;它将它们保存在内存缓冲区中
¥The worker repeats step 10 from above, with the caveat that the worker does not report test results directly; it holds them in a memory buffer
-
当 worker 完成测试文件时,缓冲的结果将返回到主进程,然后将它们提供给用户指定的报告者(默认为
spec)¥When the worker completes the test file, buffered results are returned to the main process, which then gives them to the user-specified reporter (
specby default) -
工作线程让自己可供池使用;池为工作线程提供另一个要运行的测试文件(如果还有剩余)
¥The worker makes itself available to the pool; the pool gives the worker another test file to run, if any remain
-
Mocha 打印最终摘要/结语(如果适用)
¥Mocha prints a final summary/epilog, if applicable
-
Mocha 运行 全局拆解夹具(如果有)
¥Mocha runs global teardown fixtures, if any
# 检测到对 done() 的多个调用
¥Detects Multiple Calls to done()
如果你使用基于回调的异步测试,如果多次调用 done(),Mocha 将抛出错误。这对于捕获意外的双重回调非常方便。
¥If you use callback-based async tests, Mocha will throw an error if done() is called multiple times. This is handy for catching accidental double callbacks.
it('double done', function (done) {
  // Calling `done()` twice is an error
  setImmediate(done);
  setImmediate(done);
});
运行上述测试将给出以下错误消息:
¥Running the above test will give you the below error message:
$ ./node_modules/.bin/mocha mocha.test.js


  ✓ double done
  1) double done

  1 passing (6ms)
  1 failing

  1) double done:
     Error: done() called multiple times
      at Object.<anonymous> (mocha.test.js:1:63)
      at require (internal/module.js:11:18)
      at Array.forEach (<anonymous>)
      at startup (bootstrap_node.js:187:16)
      at bootstrap_node.js:608:3
# 断言
¥Assertions
Mocha 允许你使用任何你想要的断言库。在上面的例子中,we’正在使用 Node.js’ 内置了 assert 模块 - 但一般来说,如果它抛出一个 Error,它就会起作用!这意味着你可以使用以下库:
¥Mocha allows you to use any assertion library you wish. In the above example, we’re using Node.js’ built-in assert module — but generally, if it throws an Error, it will work! This means you can use libraries such as:
-
should.js - 这些文档中显示的 BDD 风格
¥should.js - BDD style shown throughout these docs
-
expect.js -
expect()风格断言¥expect.js -
expect()style assertions -
chai -
expect()、assert()和should式断言¥chai -
expect(),assert()andshould-style assertions -
better-assert - C 风格自记录
assert()¥better-assert - C-style self-documenting
assert() -
unexpected - “可扩展的 BDD 断言工具包”
¥unexpected - “the extensible BDD assertion toolkit”
# 异步代码
¥Asynchronous Code
通过将参数(通常名为 done)添加到 it() 到测试回调中,Mocha 将知道它应该等待调用此函数来完成测试。此回调接受 Error 实例(或其子类)或虚假值;其他任何内容都是无效使用并引发错误(通常会导致测试失败)。
¥By adding an argument (usually named done) to it() to a test callback, Mocha will know that it should wait for this function to be called to complete the test. This callback accepts both an Error instance (or subclass thereof) or a falsy value; anything else is invalid usage and throws an error (usually causing a failed test).
describe('User', function () {
  describe('#save()', function () {
    it('should save without error', function (done) {
      var user = new User('Luna');
      user.save(function (err) {
        if (err) done(err);
        else done();
      });
    });
  });
});
或者,直接使用 done() 回调(它将处理错误参数,如果存在):
¥Alternatively, use the done() callback directly (which will handle an error argument, if it exists):
describe('User', function () {
  describe('#save()', function () {
    it('should save without error', function (done) {
      var user = new User('Luna');
      user.save(done);
    });
  });
});
# 与 Promise 一起工作
¥Working with Promises
或者,你可以返回 Promise,而不是使用 done() 回调。如果你正在测试的 API 返回 promise 而不是采用回调,这非常有用:
¥Alternately, instead of using the done() callback, you may return a Promise. This is useful if the APIs you are testing return promises instead of taking callbacks:
beforeEach(function () {
  return db.clear().then(function () {
    return db.save([tobi, loki, jane]);
  });
});

describe('#find()', function () {
  it('respond with matching records', function () {
    return db.find({type: 'User'}).should.eventually.have.length(3);
  });
});
后一个示例使用 Chai 作为 Promise 进行流畅的 Promise 断言。
¥The latter example uses Chai as Promised for fluent promise assertions.
在 Mocha v3.0.0 及更高版本中,返回 Promise 并调用 done() 将导致异常,因为这通常是一个错误:
¥In Mocha v3.0.0 and newer, returning a Promise and calling done() will result in an exception, as this is generally a mistake:
const assert = require('assert');

// antipattern
it('should complete this test', function (done) {
  return new Promise(function (resolve) {
    assert.ok(true);
    resolve();
  }).then(done);
});
上述测试将因 Error: Resolution method is overspecified. Specify a callback *or* return a Promise; not both. 而失败。在 v3.0.0 之前的版本中,对 done() 的调用实际上被忽略。
¥The above test will fail with Error: Resolution method is overspecified. Specify a callback *or* return a Promise; not both.. In versions older than v3.0.0, the call to done() is effectively ignored.
# 使用异步/等待
¥Using async / await
如果你的 JS 环境支持 异步/等待,你还可以像这样编写异步测试:
¥If your JS environment supports async / await, you can also write asynchronous tests like this:
beforeEach(async function () {
  await db.clear();
  await db.save([tobi, loki, jane]);
});

describe('#find()', function () {
  it('responds with matching records', async function () {
    const users = await db.find({type: 'User'});
    users.should.have.length(3);
  });
});
# 异步回调的局限性
¥Limitations of asynchronous callbacks
你可以在 it()、before()、after()、beforeEach()、afterEach() 的回调中使用所有异步回调(done、Promise 和 async/await),但不能在 describe() 的回调中使用 - 它必须是同步的。请参阅 #5046 了解更多信息。
¥You can use all asynchronous callbacks (done, Promise, and async/await) in callbacks for it(), before(), after(), beforeEach(), afterEach()) but not describe() – it must be synchronous.
See #5046 for more information.
# 同步代码
¥Synchronous Code
测试同步代码时,省略回调,Mocha 将自动继续下一个测试。
¥When testing synchronous code, omit the callback and Mocha will automatically continue on to the next test.
describe('Array', function () {
  describe('#indexOf()', function () {
    it('should return -1 when the value is not present', function () {
      [1, 2, 3].indexOf(5).should.equal(-1);
      [1, 2, 3].indexOf(0).should.equal(-1);
    });
  });
});
# 箭头函数
¥Arrow Functions
不鼓励将 箭头函数(又名 “lambdas”)传递给 Mocha。Lambda 词法绑定 this,无法访问 Mocha 上下文。例如,以下代码将失败:
¥Passing arrow functions (aka “lambdas”) to Mocha is discouraged. Lambdas lexically bind this and cannot access the Mocha context. For example, the following code will fail:
describe('my suite', () => {
  it('my test', () => {
    // should set the timeout of this test to 1000 ms; instead will fail
    this.timeout(1000);
    assert.ok(true);
  });
});
如果你不需要使用 Mocha 的上下文,那么 lambda 应该可以工作。请注意,如果最终需要,使用 lambda 进行重构会更加困难!
¥If you do not need to use Mocha’s context, lambdas should work. Be aware that using lambdas will be more painful to refactor if the need eventually arises!
或者,你可以通过链式调用创建的测试和/或钩子的方法来覆盖某些上下文变量(例如测试超时):
¥Alternatively, you can override certain context variables, such as test timeouts, by chain-calling methods of the created tests and/or hooks:
describe('my suite', () => {
  beforeEach(() => {}).timeout(1000);
  it('my test', () => {
    assert.ok(true);
  }).timeout(1000);
}).timeout(1000);
# 钩子
¥Hooks
通过其默认的 “BDD” 风格的界面,Mocha 提供了 before()、after()、beforeEach() 和 afterEach() 钩子。这些应该用于设置前提条件并在测试后进行清理。
¥With its default “BDD”-style interface, Mocha provides the hooks before(), after(), beforeEach(), and afterEach(). These should be used to set up preconditions and clean up after your tests.
describe('hooks', function () {
  before(function () {
    // runs once before the first test in this block
  });

  after(function () {
    // runs once after the last test in this block
  });

  beforeEach(function () {
    // runs before each test in this block
  });

  afterEach(function () {
    // runs after each test in this block
  });

  // test cases
});
测试可以出现在钩子之前、之后或散布在钩子之中。钩子将按照它们定义的顺序运行(视情况而定);所有
before()钩子运行(一次),然后运行任何beforeEach()钩子、测试、任何afterEach()钩子,最后运行after()钩子(一次)。¥Tests can appear before, after, or interspersed with your hooks. Hooks will run in the order they are defined, as appropriate; all
before()hooks run (once), then anybeforeEach()hooks, tests, anyafterEach()hooks, and finallyafter()hooks (once).
# 描述钩子
¥Describing Hooks
任何钩子都可以通过可选描述来调用,从而更容易查明测试中的错误。如果为钩子指定了命名函数,则在未提供描述的情况下将使用该名称。
¥Any hook can be invoked with an optional description, making it easier to pinpoint errors in your tests. If a hook is given a named function, that name will be used if no description is supplied.
beforeEach(function () {
  // beforeEach hook
});

beforeEach(function namedFun() {
  // beforeEach:namedFun
});

beforeEach('some description', function () {
  // beforeEach:some description
});
# 异步钩子
¥Asynchronous Hooks
所有钩子(before()、after()、beforeEach()、afterEach())也可以是同步或异步的,其行为与常规测试用例非常相似。例如,你可能希望在每次测试之前使用虚拟内容填充数据库:
¥All hooks (before(), after(), beforeEach(), afterEach()) may be sync or async as well, behaving much like a regular test-case. For example, you may wish to populate database with dummy content before each test:
describe('Connection', function () {
  var db = new Connection(),
    tobi = new User('tobi'),
    loki = new User('loki'),
    jane = new User('jane');

  beforeEach(function (done) {
    db.clear(function (err) {
      if (err) return done(err);
      db.save([tobi, loki, jane], done);
    });
  });

  describe('#find()', function () {
    it('respond with matching records', function (done) {
      db.find({type: 'User'}, function (err, res) {
        if (err) return done(err);
        res.should.have.length(3);
        done();
      });
    });
  });
});
# 根级钩子
¥Root-Level Hooks
在测试文件的顶部作用域(套件之外)定义的钩子是根钩子。
¥A hook defined at the top scope of a test file (outside of a suite) is a root hook.
从 v8.0.0 开始,根钩子插件 是设置根钩子的首选机制。
¥As of v8.0.0, Root Hook Plugins are the preferred mechanism for setting root hooks.
# 延迟根套件
¥Delayed Root Suite
警告:延迟根套件与 并行模式 不兼容。
¥WARNING: Delayed root suites are incompatible with parallel mode.
如果你需要在运行任何套件之前执行异步操作(例如动态生成测试),则可能会延迟根套件。使用 --delay 标志运行 mocha。这会将一个特殊的回调函数 run() 附加到全局上下文:
¥If you need to perform asynchronous operations before any of your suites are run (e.g. for dynamically generating tests), you may delay the root suite. Run mocha with the --delay flag. This will attach a special callback function, run(), to the global context:
const assert = require('assert');

const fn = async x => {
  return new Promise(resolve => {
    setTimeout(resolve, 3000, 2 * x);
  });
};

// instead of an IIFE, you can use 'setImmediate' or 'nextTick' or 'setTimeout'
(async function () {
  const z = await fn(3);

  describe('my suite', function () {
    it(`expected value ${z}`, function () {
      assert.strictEqual(z, 6);
    });
  });

  run();
})();
# 待定测试
¥Pending Tests
“待办的” — 如 “最终应该有人编写这些测试用例” — 测试用例是那些没有回调的测试用例:
¥"Pending" — as in “someone should write these test cases eventually” — test-cases are those without a callback:
describe('Array', function () {
  describe('#indexOf()', function () {
    // pending test below
    it('should return -1 when the value is not present');
  });
});
待处理的测试将包含在测试结果中,并标记为待处理。待处理的测试不被视为失败的测试。
¥Pending tests will be included in the test results, and marked as pending. A pending test is not considered a failed test.
阅读 包容性测试部分,了解通过 this.skip() 有条件地将测试标记为待处理的示例。
¥Read the inclusive tests section for an example of conditionally marking a test as pending via this.skip().
# 独家测试
¥Exclusive Tests
警告:独家测试与 并行模式 不兼容。
¥WARNING: Exclusive tests are incompatible with parallel mode.
排他性功能允许你通过将 .only() 附加到函数来仅运行指定的套件或测试用例。这是仅执行特定套件的示例:
¥The exclusivity feature allows you to run only the specified suite or test-case
by appending .only() to the function. Here’s an example of executing only a particular suite:
describe('Array', function () {
  describe.only('#indexOf()', function () {
    // ...
  });
});
注意:所有嵌套套件仍将被执行。
¥Note: All nested suites will still be executed.
这是执行单个测试用例的示例:
¥Here’s an example of executing an individual test case:
describe('Array', function () {
  describe('#indexOf()', function () {
    it.only('should return -1 unless present', function () {
      // ...
    });

    it('should return the index when present', function () {
      // ...
    });
  });
});
在 v3.0.0 之前,.only() 使用字符串匹配来决定执行哪些测试;这已不再是这种情况。在 v3.0.0 或更高版本中,可以多次使用 .only() 来定义要运行的测试子集:
¥Previous to v3.0.0, .only() used string matching to decide which tests to execute; this is no longer the case. In v3.0.0 or newer, .only() can be used multiple times to define a subset of tests to run:
describe('Array', function () {
  describe('#indexOf()', function () {
    it.only('should return -1 unless present', function () {
      // this test will be run
    });

    it.only('should return the index when present', function () {
      // this test will also be run
    });

    it('should return -1 if called with a non-Array context', function () {
      // this test will not be run
    });
  });
});
你也可以选择多套件:
¥You may also choose multiple suites:
describe('Array', function () {
  describe.only('#indexOf()', function () {
    it('should return -1 unless present', function () {
      // this test will be run
    });

    it('should return the index when present', function () {
      // this test will also be run
    });
  });

  describe.only('#concat()', function () {
    it('should return a new Array', function () {
      // this test will also be run
    });
  });

  describe('#slice()', function () {
    it('should return a new Array', function () {
      // this test will not be run
    });
  });
});
但测试优先:
¥But tests will have precedence:
describe('Array', function () {
  describe.only('#indexOf()', function () {
    it.only('should return -1 unless present', function () {
      // this test will be run
    });

    it('should return the index when present', function () {
      // this test will not be run
    });
  });
});
注意:钩子(如果存在)仍将被执行。
¥Note: Hooks, if present, will still be executed.
请注意不要将
.only()的用法提交到版本控制中,除非你真的这么想!为此,可以在持续集成测试命令(或 git precommit hook 中)中使用选项--forbid-only运行 mocha。¥Be mindful not to commit usages of
.only()to version control, unless you really mean it! To do so one can run mocha with the option--forbid-onlyin the continuous integration test command (or in a git precommit hook).
# 包容性测试
¥Inclusive Tests
该特性与 .only() 相反。通过附加 .skip(),你可以告诉 Mocha 忽略测试用例。任何跳过的内容都将标记为 pending,并按此报告。以下是跳过单个测试的示例:
¥This feature is the inverse of .only(). By appending .skip(), you may tell Mocha to ignore test case(s). Anything skipped will be marked as pending, and reported as such. Here’s an example of skipping an individual test:
describe('Array', function () {
  describe('#indexOf()', function () {
    it.skip('should return -1 unless present', function () {
      // this test will not be run
    });

    it('should return the index when present', function () {
      // this test will be run
    });
  });
});
你还可以将 .skip() 放在整个套件上。这相当于将 .skip() 附加到套件中的所有测试中。套件中的钩子也被跳过。
¥You can also put .skip() on an entire suite. This is equivalent to appending .skip() onto all tests in the suite. Hooks in the suite are also skipped.
describe('Array', function () {
  describe.skip('#indexOf()', function () {
    it('should return -1 unless present', function () {
      // this test will not be run
    });
  });
});
注意:跳过的套件中放置在钩子或测试之外的代码仍然会执行,因为 mocha 仍然会调用套件函数来构建套件结构以进行可视化。
¥Note: Code in skipped suites, that is placed outside of hooks or tests is still executed, as mocha will still invoke the suite function to build up the suite structure for visualization.
最佳实践:使用
.skip()而不是注释掉测试。¥Best practice: Use
.skip()instead of commenting tests out.
你也可以使用 this.skip() 在运行时跳过。如果测试需要事先无法检测到的环境或配置,则可以适当跳过运行时。例如:
¥You may also skip at runtime using this.skip(). If a test needs an environment or configuration which cannot be detected beforehand, a runtime skip is appropriate. For example:
it('should only test in the correct environment', function() {
  if (/* check test environment */) {
    // make assertions
  } else {
    this.skip();
  }
});
上述测试将报告为 pending。还需要注意的是,调用 this.skip() 将有效地中止测试。
¥The above test will be reported as pending. It’s also important to note that calling this.skip() will effectively abort the test.
最佳实践:为了避免混淆,在调用
this.skip()后不要在测试或钩子中执行进一步的指令。¥Best practice: To avoid confusion, do not execute further instructions in a test or hook after calling
this.skip().
将上面的测试与下面的代码进行对比:
¥Contrast the above test with the following code:
it('should only test in the correct environment', function() {
  if (/* check test environment */) {
    // make assertions
  } else {
    // do nothing
  }
});
由于此测试不执行任何操作,因此将报告为通过。
¥Because this test does nothing, it will be reported as passing.
最佳实践:什么都不要做!测试应该做出断言或使用
this.skip()。¥Best practice: Don’t do nothing! A test should make an assertion or use
this.skip().
要以这种方式跳过多个测试,请在 “首先” 钩子中使用 this.skip():
¥To skip multiple tests in this manner, use this.skip() in a “before all” hook:
before(function() {
  if (/* check test environment */) {
    // setup code
  } else {
    this.skip();
  }
});
这将跳过套件中的所有 it、beforeEach/afterEach 和 describe 块。before/after 钩子将被跳过,除非它们与包含 this.skip() 的钩子定义在同一级别。
¥This will skip all it, beforeEach/afterEach, and describe blocks within the suite. before/after hooks are skipped unless they are defined at the same level as the hook containing this.skip().
describe('outer', function () {
  before(function () {
    this.skip();
  });

  after(function () {
    // will be executed
  });

  describe('inner', function () {
    before(function () {
      // will be skipped
    });

    after(function () {
      // will be skipped
    });
  });
});
v7.0.0 更新:不允许跳过 “毕竟” 钩子内的测试,并且会引发异常。使用 return 语句或其他方式中止钩子执行。
¥Updated in v7.0.0: skipping a test within an “after all” hook is disallowed and will throw an exception. Use a return statement or other means to abort hook execution.
在 Mocha v3.0.0 之前,异步测试和钩子不支持 this.skip()。
¥Before Mocha v3.0.0, this.skip() was not supported in asynchronous tests and hooks.
# 重试测试
¥Retry Tests
你可以选择重试失败的测试,最多可达一定次数。此功能旨在处理资源无法轻松模拟/存根的端到端测试(功能测试/Selenium…)。不建议使用此功能进行单元测试。
¥You can choose to retry failed tests up to a certain number of times. This feature is designed to handle end-to-end tests (functional tests/Selenium…) where resources cannot be easily mocked/stubbed. It’s not recommended to use this feature for unit tests.
此功能会重新运行失败的测试及其相应的 beforeEach/afterEach 钩子,但不会重新运行 before/after 钩子。this.retries() 对失败的钩子没有影响。
¥This feature does re-run a failed test and its corresponding beforeEach/afterEach hooks, but not before/after hooks. this.retries() has no effect on failing hooks.
注意:下面的示例是使用 Selenium webdriver(其中 覆盖全局 Mocha 钩子 代表 Promise 链)编写的。
¥NOTE: Example below was written using Selenium webdriver (which overwrites global Mocha hooks for Promise chain).
describe('retries', function () {
  // Retry all tests in this suite up to 4 times
  this.retries(4);

  beforeEach(function () {
    browser.get('http://www.yahoo.com');
  });

  it('should succeed on the 3rd try', function () {
    // Specify this test to only retry up to 2 times
    this.retries(2);
    expect($('.foo').isDisplayed()).to.eventually.be.true;
  });
});
# 动态生成测试
¥Dynamically Generating Tests
鉴于 Mocha 使用函数表达式来定义套件和测试用例,动态生成测试非常简单。不需要特殊的语法 - 简单的 JavaScript 可用于实现类似于 “parameterized” 测试的功能,你可能已经在其他框架中看到过这些功能。
¥Given Mocha’s use of function expressions to define suites and test cases, it’s straightforward to generate your tests dynamically. No special syntax is required — plain ol’ JavaScript can be used to achieve functionality similar to “parameterized” tests, which you may have seen in other frameworks.
举个例子:
¥Take the following example:
const assert = require('assert');

function add(args) {
  return args.reduce((prev, curr) => prev + curr, 0);
}

describe('add()', function () {
  const tests = [
    {args: [1, 2], expected: 3},
    {args: [1, 2, 3], expected: 6},
    {args: [1, 2, 3, 4], expected: 10}
  ];

  tests.forEach(({args, expected}) => {
    it(`correctly adds ${args.length} args`, function () {
      const res = add(args);
      assert.strictEqual(res, expected);
    });
  });
});
上面的代码将生成一个具有三个规范的套件:
¥The above code will produce a suite with three specs:
$ mocha

  add()
    ✓ correctly adds 2 args
    ✓ correctly adds 3 args
    ✓ correctly adds 4 args
在 .forEach 处理程序中添加的测试通常不能与编辑器插件很好地配合,尤其是对于 “右键运行” 功能。参数化测试的另一种方法是使用闭包生成它们。以下示例与上面的示例等效:
¥Tests added inside a .forEach handler often don’t play well with editor plugins, especially with “right-click run” features.
Another way to parameterize tests is to generate them with a closure. This following example is equivalent to the one above:
describe('add()', function () {
  const testAdd = ({args, expected}) =>
    function () {
      const res = add(args);
      assert.strictEqual(res, expected);
    };

  it('correctly adds 2 args', testAdd({args: [1, 2], expected: 3}));
  it('correctly adds 3 args', testAdd({args: [1, 2, 3], expected: 6}));
  it('correctly adds 4 args', testAdd({args: [1, 2, 3, 4], expected: 10}));
});
使用 top-level await,你可以在加载测试文件时以动态异步的方式收集测试数据。
¥With top-level await you can collect your test data in a dynamic and asynchronous way while the test file is being loaded.
另请参阅 --delay 以获取不带 top-level await 的 CommonJS 模块。
¥See also --delay for CommonJS modules without top-level await.
// testfile.mjs
import assert from 'assert';

// top-level await: Node >= v14.8.0 with ESM test file
const tests = await new Promise(resolve => {
  setTimeout(resolve, 5000, [
    {args: [1, 2], expected: 3},
    {args: [1, 2, 3], expected: 6},
    {args: [1, 2, 3, 4], expected: 10}
  ]);
});

// in suites ASYNCHRONOUS callbacks are NOT supported
describe('add()', function () {
  tests.forEach(({args, expected}) => {
    it(`correctly adds ${args.length} args`, function () {
      const res = args.reduce((sum, curr) => sum + curr, 0);
      assert.strictEqual(res, expected);
    });
  });
});
测试时间
许多报告器将显示测试持续时间并标记缓慢的测试(默认值:75ms),如 SPEC 报告器所示:
¥Many reporters will display test duration and flag tests that are slow (default: 75ms), as shown here with the SPEC reporter:
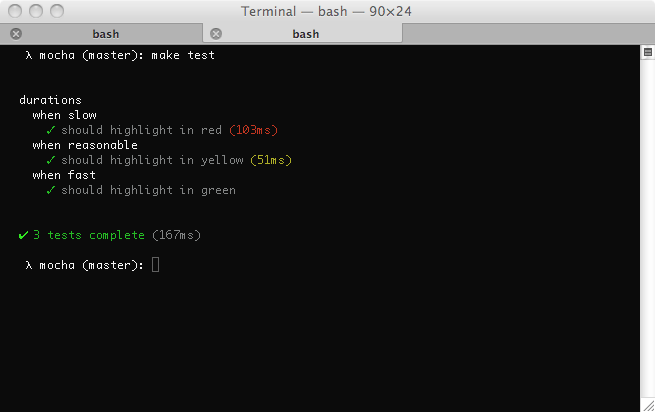
测试持续时间分为三个级别(如下图所示):
¥There are three levels of test duration (depicted in the following image):
-
快速地:在 “slow” 阈值一半内运行的测试将以绿色显示持续时间(如果有的话)。
¥FAST: Tests that run within half of the “slow” threshold will show the duration in green (if at all).
-
普通的:运行超过阈值一半(但仍在阈值内)的测试将以黄色显示持续时间。
¥NORMAL: Tests that run exceeding half of the threshold (but still within it) will show the duration in yellow.
-
慢的:运行超过阈值的测试将以红色显示持续时间。
¥SLOW: Tests that run exceeding the threshold will show the duration in red.

要调整 “slow” 的内容,你可以使用 slow() 方法:
¥To tweak what’s considered “slow”, you can use the slow() method:
describe('something slow', function () {
  this.slow(300000); // five minutes

  it('should take long enough for me to go make a sandwich', function () {
    // ...
  });
});
# 超时
¥Timeouts
# 套件级别
¥Suite-level
套件级别超时可应用于整个测试 “suites”,或通过 this.timeout(0) 禁用。这将被所有不覆盖该值的嵌套套件和测试用例继承。
¥Suite-level timeouts may be applied to entire test “suites”, or disabled via this.timeout(0). This will be inherited by all nested suites and test-cases that do not override the value.
describe('a suite of tests', function () {
  this.timeout(500);

  it('should take less than 500ms', function (done) {
    setTimeout(done, 300);
  });

  it('should take less than 500ms as well', function (done) {
    setTimeout(done, 250);
  });
});
# 测试级别
¥Test-level
还可以应用特定于测试的超时,或者使用 this.timeout(0) 一起禁用超时:
¥Test-specific timeouts may also be applied, or the use of this.timeout(0) to disable timeouts all together:
it('should take less than 500ms', function (done) {
  this.timeout(500);
  setTimeout(done, 300);
});
# 钩子级别
¥Hook-level
还可以应用钩子级超时:
¥Hook-level timeouts may also be applied:
describe('a suite of tests', function () {
  beforeEach(function (done) {
    this.timeout(3000); // A very long environment setup.
    setTimeout(done, 2500);
  });
});
再次使用 this.timeout(0) 禁用钩子超时。
¥Again, use this.timeout(0) to disable the timeout for a hook.
在 v3.0.0 或更高版本中,传递给
this.timeout()的参数大于 最大延迟值 将导致超时被禁用。在 v8.0.0 或更高版本中,this.enableTimeouts()已被删除。警告:对于异步测试,如果你通过this.timeout(0)禁用超时,然后不调用done(),你的测试将静默退出。¥In v3.0.0 or newer, a parameter passed to
this.timeout()greater than the maximum delay value will cause the timeout to be disabled. In v8.0.0 or newer,this.enableTimeouts()has been removed. Warning: With async tests if you disable timeouts viathis.timeout(0)and then do not calldone(), your test will exit silently.
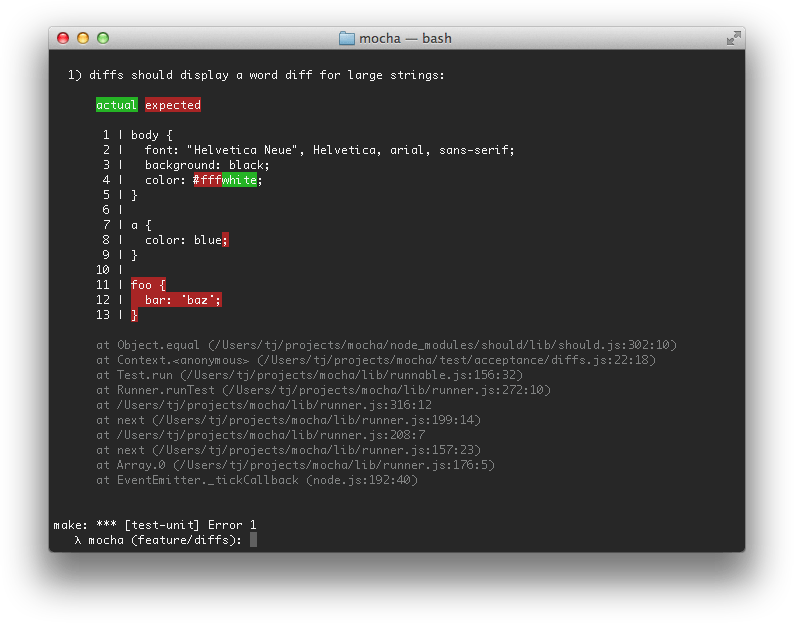
# 差异
¥Diffs
Mocha 支持断言库中抛出的任何 AssertionError 的 err.expected 和 err.actual 属性。Mocha 将尝试显示预期内容与断言实际看到的内容之间的差异。以下是使用 --inline-diffs 进行 “string” 差异的示例:
¥Mocha supports the err.expected and err.actual properties of any thrown AssertionErrors from an assertion library. Mocha will attempt to display the difference between what was expected, and what the assertion actually saw. Here’s an example of a “string” diff using --inline-diffs:
# 命令行用法
¥Command-Line Usage
mocha [spec…]
Run tests with Mocha
Commands
mocha inspect [spec…] Run tests with Mocha [default]
mocha init
Rules & Behavior –allow-uncaught Allow uncaught errors to propagate [boolean] -A, --async-only Require all tests to use a callback (async) or return a Promise [boolean] -b, --bail Abort (“bail”) after first test failure [boolean] –check-leaks Check for global variable leaks [boolean] –delay Delay initial execution of root suite [boolean] –dry-run Report tests without executing them[boolean] –exit Force Mocha to quit after tests complete [boolean] –pass-on-failing-test-suite Not fail test run if tests were failed [boolean] [default: false] –fail-zero Fail test run if no test(s) encountered [boolean] –forbid-only Fail if exclusive test(s) encountered [boolean] –forbid-pending Fail if pending test(s) encountered[boolean] –global, --globals List of allowed global variables [array] -j, --jobs Number of concurrent jobs for --parallel; use 1 to run in serial [number] [default: (number of CPU cores - 1)] -p, --parallel Run tests in parallel [boolean] –posix-exit-codes Use POSIX and UNIX shell exit codes as Mocha’s return value [boolean] –retries Retry failed tests this many times [number] -s, --slow Specify “slow” test threshold (in milliseconds) [string] [default: 75] -t, --timeout, --timeouts Specify test timeout threshold (in milliseconds) [string] [default: 2000] -u, --ui Specify user interface [string] [default: “bdd”]
Reporting & Output -c, --color, --colors Force-enable color output [boolean] –diff Show diff on failure [boolean] [default: true] –full-trace Display full stack traces [boolean] –inline-diffs Display actual/expected differences inline within each string [boolean] -R, --reporter Specify reporter to use [string] [default: “spec”] -O, --reporter-option, Reporter-specific options –reporter-options (<k=v,[k1=v1,…]>) [array]
Configuration –config Path to config file [string] [default: (nearest rc file)] -n, --node-option Node or V8 option (no leading “–”) [array] –package Path to package.json for config [string]
File Handling –extension File extension(s) to load [array] [default: [“js”,“cjs”,“mjs”]] –file Specify file(s) to be loaded prior to root suite execution [array] [default: (none)] –ignore, --exclude Ignore file(s) or glob pattern(s) [array] [default: (none)] –recursive Look for tests in subdirectories [boolean] -r, --require Require module [array] [default: (none)] -S, --sort Sort test files [boolean] -w, --watch Watch files in the current working directory for changes [boolean] –watch-files List of paths or globs to watch [array] –watch-ignore List of paths or globs to exclude from watching [array] [default: [“node_modules”,“.git”]]
Test Filters -f, --fgrep Only run tests containing this string [string] -g, --grep Only run tests matching this string or regexp [string] -i, --invert Inverts --grep and --fgrep matches [boolean]
Positional Arguments spec One or more files, directories, or globs to test [array] [default: [“test”]]
Other Options -h, --help Show usage information & exit [boolean] -V, --version Show version number & exit [boolean] –list-interfaces List built-in user interfaces & exit [boolean] –list-reporters List built-in reporters & exit [boolean]
Mocha Resources Chat: https://discord.gg/KeDn2uXhER GitHub: https://github.com/mochajs/mocha.git Docs: https://mochajs.org/
# --allow-uncaught
默认情况下,Mocha 将尝试捕获运行测试引发的未捕获异常,并将其报告为测试失败。使用 --allow-uncaught 禁用此行为并允许传播未捕获的异常。通常会导致进程崩溃。
¥By default, Mocha will attempt to trap uncaught exceptions thrown from running tests and report these as test failures. Use --allow-uncaught to disable this behavior and allow uncaught exceptions to propagate. Will typically cause the process to crash.
当调试特别难以跟踪的异常时,此标志非常有用。
¥This flag is useful when debugging particularly difficult-to-track exceptions.
# --async-only, -A
强制执行测试必须以 “async” 风格编写的规则,这意味着每个测试提供 done 回调或返回 Promise。不符合要求的测试将被标记为失败。
¥Enforce a rule that tests must be written in “async” style, meaning each test provides a done callback or returns a Promise. Non-compliant tests will be marked as failures.
# --bail, -b
导致 Mocha 在遇到第一次测试失败后停止运行测试。执行相应的 “每个之后” 和 “毕竟” 钩子以进行潜在的清理。
¥Causes Mocha to stop running tests after the first test failure it encounters. Corresponding “after each” and “after all” hooks are executed for potential cleanup.
--bail 并不意味着 --exit。
¥--bail does not imply --exit.
# --check-leaks
使用此选项可以让 Mocha 检查运行测试时泄漏的全局变量。通过 --global 选项指定可接受的全局变量(例如:--check-leaks --global jQuery --global MyLib)。
¥Use this option to have Mocha check for global variables that are leaked while running tests. Specify globals that are acceptable via the --global option (for example: --check-leaks --global jQuery --global MyLib).
# --compilers
--compilers在 v6.0.0 中被删除。参见 进一步的解释和解决方法。¥*
--compilerswas removed in v6.0.0. See further explanation and workarounds.*
# --dry-run
自 v9.0.0 起报告测试而不执行任何测试或钩子。
¥Since v9.0.0 Report tests without executing any of them, neither tests nor hooks.
# --exit
在 v4.0.0 中更新。
¥Updated in v4.0.0.
TL;DR:如果你的测试在升级到 Mocha v4.0.0 或更高版本后挂起,请使用 --exit 进行快速(但不一定推荐)修复。
¥TL;DR: If your tests hang after an upgrade to Mocha v4.0.0 or newer, use --exit for a quick (though not necessarily recommended) fix.
在 v4.0.0 版本之前,默认情况下,Mocha 在执行完所有测试后会强制自己的进程退出。这种行为会带来一系列潜在的问题;它表明测试(或夹具、线束、被测代码等)在测试后无法正确清理。最终,“dirty” 测试可能(但并非总是)导致假阳性或假阴性结果。
¥Prior to version v4.0.0, by default, Mocha would force its own process to exit once it was finished executing all tests. This behavior enables a set of potential problems; it’s indicative of tests (or fixtures, harnesses, code under test, etc.) which don’t clean up after themselves properly. Ultimately, “dirty” tests can (but not always) lead to false positive or false negative results.
如果服务器仍在监听端口,或者套接字仍处于打开状态等,则 “挂起” 最常出现。它也可能类似于失控的 setInterval(),甚至是从未实现的错误 Promise。
¥"Hanging" most often manifests itself if a server is still listening on a port, or a socket is still open, etc. It can also be something like a runaway setInterval(), or even an errant Promise that never fulfilled.
v4.0.0(及更高版本)中的默认行为是 --no-exit,以前是 --exit。
¥The default behavior in v4.0.0 (and newer) is --no-exit, where previously it was --exit.
解决 “fix” 问题的最简单方法是将 --exit 传递给 Mocha 进程。调试可能非常耗时 - 因为问题出在哪里并不总是显而易见 - 但建议这样做。
¥The easiest way to “fix” the issue is to pass --exit to the Mocha process. It can be time-consuming to debug — because it’s not always obvious where the problem is — but it is recommended to do so.
为了确保你的测试不会留下混乱,这里有一些开始的想法:
¥To ensure your tests aren’t leaving messes around, here are some ideas to get started:
-
参见 Node.js 调试指南
¥See the Node.js guide to debugging
-
使用新的
async_hooksAPI (example)¥Use the new
async_hooksAPI (example) -
尝试类似 wtfnode 的东西
¥Try something like wtfnode
-
使用
.only直到找到导致 Mocha 挂起的测试¥Use
.onlyuntil you find the test that causes Mocha to hang
# --pass-on-failing-test-suite
自 v10.7.0 起
¥Since v10.7.0
如果设置为 true,Mocha 会返回退出代码 0,即使运行期间有失败的测试。
¥If set to true, Mocha returns exit code 0 even if there are failed tests during run.
# --fail-zero
自 v9.1.0 起
¥Since v9.1.0
如果没有遇到 exit-code: 1 测试,则测试运行失败。
¥Fail test run if no tests are encountered with exit-code: 1.
# --forbid-only
强制执行测试不得具有排他性的规则(不允许使用例如 describe.only() 或 it.only())。
¥Enforce a rule that tests may not be exclusive (use of e.g., describe.only() or it.only() is disallowed).
当遇到独占 (“只是”) 测试或套件时,--forbid-only 会导致 Mocha 失败,并且会中止进一步的测试执行。
¥--forbid-only causes Mocha to fail when an exclusive (“only’d”) test or suite is encountered, and it will abort further test execution.
# --forbid-pending
强制执行不得跳过测试的规则(不允许在任何地方使用例如 describe.skip()、it.skip() 或 this.skip())。
¥Enforce a rule that tests may not be skipped (use of e.g., describe.skip(), it.skip(), or this.skip() anywhere is disallowed).
当遇到跳过的 (“pending”) 测试或套件时,--forbid-pending 会导致 Mocha 失败,并且会中止进一步的测试执行。
¥--forbid-pending causes Mocha to fail when a skipped (“pending”) test or suite is encountered, and it will abort further test execution.
# --global <variable-name>
v6.0.0 更新;选项是
--global,--globals现在是别名。¥Updated in v6.0.0; the option is
--globaland--globalsis now an alias.
定义全局变量名。例如,假设你的应用故意公开名为 app 和 YUI 的全局变量,你可能需要添加 --global app --global YUI。
¥Define a global variable name. For example, suppose your app deliberately exposes a global named app and YUI, you may want to add --global app --global YUI.
--global 接受通配符。你可以执行 --global '*bar',它将匹配 foobar、barbar 等。你还可以传入 '*' 来忽略所有全局变量。
¥--global accepts wildcards. You could do --global '*bar' and it would match foobar, barbar, etc. You can also pass in '*' to ignore all globals.
--global 可以接受逗号分隔的列表;--global app,YUI 相当于 --global app --global YUI。
¥--global can accept a comma-delimited list; --global app,YUI is equivalent to --global app --global YUI.
通过将此选项与 --check-leaks 结合使用,你可以指定你希望泄漏到全局作用域的已知全局变量的白名单。
¥By using this option in conjunction with --check-leaks, you can specify a whitelist of known global variables that you expect to leak into global scope.
# --posix-exit-codes
使用标准 POSIX 退出代码退出,而不是失败的测试数量。
¥Exits with standard POSIX exit codes instead of the number of failed tests.
这些退出代码如下:
¥Those exit codes are:
-
0:如果所有测试都通过¥
0: if all tests passed -
1:如果任何测试失败¥
1: if any test failed -
如果给出信号,则
128 + <signal>生效,例如:¥
128 + <signal>if given a signal, such as:-
134:
SIGABRT(128 + 6) -
143:
SIGTERM(128 + 15)
-
# --retries <n>
重试失败的测试 n 次。
¥Retries failed tests n times.
默认情况下,Mocha 不会重试失败的测试。
¥Mocha does not retry test failures by default.
# --slow <ms>, -s <ms>
指定 “slow” 测试阈值(以毫秒为单位)。Mocha 使用它来高亮花费太长时间的测试用例。“慢的” 测试不被视为失败。
¥Specify the “slow” test threshold in milliseconds. Mocha uses this to highlight test cases that are taking too long. “Slow” tests are not considered failures.
注意:执行了 “slow” 时间一半的测试将使用默认的 spec 报告器以黄色高亮;执行整个 “slow” 时间的测试将以红色高亮。
¥Note: A test that executes for half of the “slow” time will be highlighted in yellow with the default spec reporter; a test that executes for entire “slow” time will be highlighted in red.
# --timeout <ms>, -t <ms>
v6.0.0 更新:使用检查标志调用 Mocha 时隐含
--timeout 0。不再需要--timeout 99999999。¥Update in v6.0.0:
--timeout 0is implied when invoking Mocha using inspect flags.--timeout 99999999is no longer needed.
指定测试用例超时,默认为两 (2) 秒(2000 毫秒)。花费超过此时间的测试将被标记为失败。
¥Specifies the test case timeout, defaulting to two (2) seconds (2000 milliseconds). Tests taking longer than this amount of time will be marked as failed.
要覆盖,你可以传递以毫秒为单位的超时,或带有 s 后缀的值,例如 --timeout 2s 和 --timeout 2000 是等效的。
¥To override you may pass the timeout in milliseconds, or a value with the s suffix, e.g., --timeout 2s and --timeout 2000 are equivalent.
要禁用超时,请使用 --timeout 0。
¥To disable timeouts, use --timeout 0.
注意:同步(阻塞)测试也受超时限制,但直到代码停止阻塞它们才会完成。无限循环仍然是无限循环!
¥Note: synchronous (blocking) tests are also bound by the timeout, but they will not complete until the code stops blocking. Infinite loops will still be infinite loops!
# --ui <name>, -u <name>
--ui 选项允许你指定要使用的接口,默认为 bdd。
¥The --ui option lets you specify the interface to use, defaulting to bdd.
# --color, -c, --colors
在 v6.0.0 中更新。
--colors现在是--color的别名。¥Updated in v6.0.0.
--colorsis now an alias for--color.
启用 “强制” 颜色输出,或者通过 --no-color 强制禁用它。默认情况下,Mocha 使用 supports-color 模块来决定。
¥"Force" color output to be enabled, or alternatively force it to be disabled via --no-color. By default, Mocha uses the supports-color module to decide.
在某些情况下,某些以机器可读格式输出的报告器将显式抑制颜色输出。
¥In some cases, color output will be explicitly suppressed by certain reporters outputting in a machine-readable format.
# --diff
如果可能,在遇到断言失败时显示预期值和实际值之间的差异。
¥When possible, show the difference between expected and actual values when an assertion failure is encountered.
该标志很不寻常,因为它默认为 true;使用 --no-diff 来抑制 Mocha 自己的 diff 输出。
¥This flag is unusual in that it defaults to true; use --no-diff to suppress Mocha’s own diff output.
一些断言库将提供自己的差异,在这种情况下,无论默认值如何,都不会使用 Mocha 的差异。
¥Some assertion libraries will supply their own diffs, in which case Mocha’s will not be used, regardless of the default value.
Mocha 自己的 diff 输出不符合任何已知标准,并且被设计为人类可读的。
¥Mocha’s own diff output does not conform to any known standards, and is designed to be human-readable.
自 v9.2.1 起
¥Since v9.2.1
默认情况下,在生成差异之前,字符串会被截断为 8192 个字符。这是为了防止大字符串出现性能问题。
¥By default strings are truncated to 8192 characters before generating a diff. This is to prevent performance problems with large strings.
然而,在比较大字符串时,它可能会使输出更难以解释。因此可以使用 --reporter-option maxDiffSize=[number] 配置该值。
¥It can however make the output harder to interpret when comparing large strings. Therefore it is possible to configure this value using --reporter-option maxDiffSize=[number].
值 0 表示无限制,默认为 8192 个字符。
¥A value of 0 indicates no limit, default is 8192 characters.
# --full-trace
启用 “full” 堆栈跟踪。默认情况下,Mocha 尝试将堆栈跟踪提取为噪音较小(尽管仍然有用)的输出。
¥Enable “full” stack traces. By default, Mocha attempts to distill stack traces into less noisy (though still useful) output.
在调试 Mocha 或 Node.js 本身中的可疑问题时,此标志很有用。
¥This flag is helpful when debugging a suspected issue within Mocha or Node.js itself.
# --inline-diffs
启用 “inline” diffs,这是比较字符串的替代输出。
¥Enable “inline” diffs, an alternative output for diffing strings.
在处理大字符串时很有用。
¥Useful when working with large strings.
如果断言库提供自己的 diff 输出,则不执行任何操作。
¥Does nothing if an assertion library supplies its own diff output.
# --reporter <name>, -R <name>
指定将使用的报告器,默认为 spec。
¥Specify the reporter that will be used, defaulting to spec.
允许使用第三方报告器。例如,mocha-lcov-reporter 在安装后可以与 --reporter mocha-lcov-reporter 一起使用。
¥Allows use of third-party reporters. For example, mocha-lcov-reporter may be used with --reporter mocha-lcov-reporter after it has been installed.
# --reporter-option <option>, -O <option>, --reporter-options <option>
在 v6.0.0 中更新。可以指定多次。
--reporter-options现在是--reporter-option的别名。¥Updated in v6.0.0. Can be specified multiple times.
--reporter-optionsis now an alias for--reporter-option.
以 <key>=<value> 格式提供特定于报告者的选项,例如 --reporter tap --reporter-option tapVersion=13。
¥Provide options specific to a reporter in <key>=<value> format, e.g., --reporter tap --reporter-option tapVersion=13.
并非所有报告器都接受选择。
¥Not all reporters accept options.
可以指定为逗号分隔的列表。
¥Can be specified as a comma-delimited list.
# --config <path>
自 v6.0.0 起
¥Since v6.0.0
指定 配置文件 的显式路径。
¥Specify an explicit path to a configuration file.
默认情况下,如果未指定 --config,Mocha 将搜索配置文件;使用 --no-config 来抑制此行为。
¥By default, Mocha will search for a config file if --config is not specified; use --no-config to suppress this behavior.
# --node-option <name>, -n <name>
自 v9.1.0 起
¥Since v9.1.0
对于 Node.js 和 V8 选项。Mocha 通过生成一个新的子进程将这些选项转发给 Node.js。
¥For Node.js and V8 options. Mocha forwards these options to Node.js by spawning a new child-process.
这些选项的设置不带前导破折号 --,例如 -n require=foo -n unhandled-rejections=strict
¥The options are set without leading dashes --, e.g. -n require=foo -n unhandled-rejections=strict
也可以指定为逗号分隔的列表:-n require=foo,unhandled-rejections=strict
¥Can also be specified as a comma-delimited list: -n require=foo,unhandled-rejections=strict
# --opts <path>
在 v8.0.0 中删除。请使用 配置文件 代替。
¥Removed in v8.0.0. Please use configuration file instead.
# --package <path>
自 v6.0.0 起
¥Since v6.0.0
指定 package.json file 的显式路径(表面上包含 mocha 属性中的配置)。
¥Specify an explicit path to a package.json file (ostensibly containing configuration in a mocha property).
默认情况下,Mocha 在当前工作目录或最近的祖级中查找 package.json,并将使用找到的第一个文件(无论它是否包含 mocha 属性);要抑制 package.json 查找,请使用 --no-package。
¥By default, Mocha looks for a package.json in the current working directory or nearest ancestor, and will use the first file found (regardless of whether it contains a mocha property); to suppress package.json lookup, use --no-package.
# --extension <ext>
具有此扩展名的文件将被视为测试文件。默认为 js。
¥Files having this extension will be considered test files. Defaults to js.
指定 --extension 将删除 .js 作为测试文件扩展名;使用 --extension js 重新添加它。例如,要加载 .mjs 和 .js 测试文件,你必须提供 --extension mjs --extension js。
¥Specifying --extension will remove .js as a test file extension; use --extension js to re-add it. For example, to load .mjs and .js test files, you must supply --extension mjs --extension js.
该选项可以多次给出。该选项接受逗号分隔的列表:--extension a,b 相当于 --extension a --extension b。
¥The option can be given multiple times. The option accepts a comma-delimited list: --extension a,b is equivalent to --extension a --extension b.
自 v8.2.0 起
¥Since v8.2.0
--extension 现在支持多部分扩展(例如 spec.js)、前导点(.js)及其组合(.spec.js);
¥--extension now supports multipart extensions (e.g., spec.js), leading dots (.js) and combinations thereof (.spec.js);
# --file <file>
警告:
--file与 并行模式 不兼容。¥WARNING:
--fileis incompatible with parallel mode.
显式包含要在其他测试文件之前加载的测试文件。允许多次使用 --file,并将按给定的顺序加载。
¥Explicitly include a test file to be loaded before other test files. Multiple uses of --file are allowed, and will be loaded in order given.
例如,如果你想声明在所有其他测试文件的每个测试之前运行的钩子,则很有用。
¥Useful if you want to declare, for example, hooks to be run before every test across all other test files.
以这种方式指定的文件不受 --sort 或 --recursive 的影响。
¥Files specified this way are not affected by --sort or --recursive.
以这种方式指定的文件应包含一个或多个套件、测试或钩子。如果不是这种情况,请考虑 --require。
¥Files specified in this way should contain one or more suites, tests or hooks. If this is not the case, consider --require instead.
# --ignore <file|directory|glob>, --exclude <file|directory|glob>,
明确忽略一个或多个原本会加载的测试文件、目录或 glob(例如 some/**/files*)。
¥Explicitly ignore one or more test files, directories or globs (e.g., some/**/files*) that would otherwise be loaded.
可以指定多次。
¥Can be specified multiple times.
自 v10.0.0 起:在 Windows 中,始终使用正斜杠
/作为路径分隔符。¥Since v10.0.0: In Windows always use forward-slashes
/as path separator.
使用 --file 指定的文件不受此选项的影响。
¥Files specified using --file are not affected by this option.
# --recursive
查找测试文件时,递归到子目录。
¥When looking for test files, recurse into subdirectories.
请参阅 --extension 了解哪些文件被视为测试文件。
¥See --extension for defining which files are considered test files.
# --require <module>, -r <module>
在加载用户界面或测试文件之前需要一个模块。这对于:
¥Require a module before loading the user interface or test files. This is useful for:
-
测试线束
¥Test harnesses
-
增强内置或全局作用域的断言库(例如 should.js)
¥Assertion libraries that augment built-ins or global scope (such as should.js)
-
编译器,例如通过 @babel/register 的 Babel 或通过 ts-node 的 TypeScript(使用
--require ts-node/register)。请参阅 Babel 或 TypeScript 工作示例。¥Compilers such as Babel via @babel/register or TypeScript via ts-node (using
--require ts-node/register). See Babel or TypeScript working examples.
以这种方式所需的模块预计能够同步工作;Mocha 不会等待所需模块中的异步任务完成。
¥Modules required in this manner are expected to do work synchronously; Mocha won’t wait for async tasks in a required module to finish.
你不能使用 --require 来设置钩子。如果你想设置要运行的钩子(例如,在每次测试之前),请使用 根钩子插件。
¥You cannot use --require to set hooks. If you want to set hooks to run, e.g., before each test, use a Root Hook Plugin.
从 v8.0.0 开始,Mocha 支持
--require和 NodeJS 原生 ESM。没有单独的--import标志。¥As of v8.0.0, Mocha supports
--requirefor NodeJS native ESM. There is no separate--importflag.
# --sort, -S
警告:
--sort与 并行模式 不兼容。¥WARNING:
--sortis incompatible with parallel mode.
使用 Array.prototype.sort 对测试文件进行排序(按绝对路径)。
¥Sort test files (by absolute path) using Array.prototype.sort.
# --watch, -w
重新运行文件更改测试。
¥Rerun tests on file changes.
--watch-files 和 --watch-ignore 选项可用于控制监视哪些文件的更改。
¥The --watch-files and --watch-ignore options can be used to control which files are watched for changes.
可以通过键入 ⓡ ⓢ ⏎(与 nodemon 相同的快捷方式)手动重新运行测试。
¥Tests may be rerun manually by typing ⓡ ⓢ ⏎ (same shortcut as nodemon).
# --watch-files <file|directory|glob>
自 v7.0.0 起
¥Since v7.0.0
设置 --watch 时要监视的路径或全局变量的列表。如果与给定 glob 匹配的文件发生更改或添加或删除,mocha 将重新运行所有测试。
¥List of paths or globs to watch when --watch is set. If a file matching the given glob changes or is added or removed mocha will rerun all tests.
如果路径是目录,则将监视所有文件和子目录。
¥If the path is a directory all files and subdirectories will be watched.
默认情况下,当前目录中具有 --extension 提供的扩展名之一且不包含在 node_modules 或 .git 文件夹中的所有文件都会受到监视。
¥By default all files in the current directory having one of the extensions provided by --extension and not contained in the node_modules or .git folders are watched.
该选项可以多次给出。该选项接受逗号分隔的列表:--watch-files a,b 相当于 --watch-files a --watch-files b
¥The option can be given multiple times. The option accepts a comma-delimited list: --watch-files a,b is equivalent to --watch-files a --watch-files b
# --watch-ignore <file|directory|glob>
自 v7.0.0 起
¥Since v7.0.0
要从监视中排除的路径或全局变量的列表。默认为 node_modules 和 .git。
¥List of paths or globs to exclude from watching. Defaults to node_modules and .git.
要排除目录中的所有文件,最好使用 foo/bar 而不是 foo/bar/**/*。后者仍将监视目录 foo/bar,但会忽略对该目录内容的所有更改。
¥To exclude all files in a directory it is preferable to use foo/bar instead of foo/bar/**/*. The latter will still watch the directory foo/bar but will ignore all changes to the content of that directory.
该选项可以多次给出。该选项接受逗号分隔的列表:--watch-ignore a,b 相当于 --watch-ignore a --watch-ignore b
¥The option can be given multiple times. The option accepts a comma-delimited list: --watch-ignore a,b is equivalent to --watch-ignore a --watch-ignore b
# --fgrep <string>, -f <string>
v6.0.0 中的重大变更;现在与
--grep互斥。¥BREAKING CHANGE in v6.0.0; now mutually exclusive with
--grep.
导致 Mocha 仅运行标题包含给定 string 的测试。
¥Cause Mocha to only run tests having titles containing the given string.
与 --grep 互斥。
¥Mutually exclusive with --grep.
# --grep <regexp>, -g <regexp>
v6.0.0 中的重大变更;现在与
--fgrep互斥。¥BREAKING CHANGE in v6.0.0; now mutually exclusive with
--fgrep.
导致 Mocha 仅运行与给定 regexp 匹配的测试,该 regexp 在内部编译为 RegExp。
¥Cause Mocha to only run tests matching the given regexp, which is internally compiled to a RegExp.
例如,假设你有 “api” 相关测试,以及 “app” 相关测试,如以下代码片段所示;可以使用 --grep api 或 --grep app 来运行其中之一。对于套件或测试用例标题的任何其他部分也是如此,--grep users 也有效,甚至 --grep GET 也有效。
¥Suppose, for example, you have “api” related tests, as well as “app” related tests, as shown in the following snippet; One could use --grep api or --grep app to run one or the other. The same goes for any other part of a suite or test-case title, --grep users would be valid as well, or even --grep GET.
另一个带双引号的选项:--grep "groupA|groupB"。
¥And another option with double quotes: --grep "groupA|groupB".
更复杂的条件如下:--grep "/get/i"。一些贝壳,例如 Git-Bash-for-Windows 可能需要:--grep "'/get/i'"。使用 ignoreCase /i 以外的标志(尤其是 /g 和 /y)可能会导致不可预测的结果。
¥And for more complex criteria: --grep "/get/i". Some shells as e.g. Git-Bash-for-Windows may require: --grep "'/get/i'". Using flags other than the ignoreCase /i (especially /g and /y) may lead to unpredictable results.
describe('api', function () {
  describe('GET /api/users groupA', function () {
    it('respond with an array of users', function () {
      // ...
    });
  });
});

describe('app', function () {
  describe('GET /users groupB', function () {
    it('respond with an array of users', function () {
      // ...
    });
  });
});
与 --fgrep 互斥。
¥Mutually exclusive with --fgrep.
# --invert
使用 --grep 或 fgrep 指定的匹配的逆。
¥Use the inverse of the match specified by --grep or fgrep.
需要 --grep 或 --fgrep(但不是两者)。
¥Requires either --grep or --fgrep (but not both).
# --inspect, --inspect-brk, inspect
启用 Node.js 的检查器。
¥Enables Node.js’ inspector.
使用 --inspect / --inspect-brk 启动 V8 检查器以与 Chrome 开发工具一起使用。
¥Use --inspect / --inspect-brk to launch the V8 inspector for use with Chrome Dev Tools.
使用 inspect 启动 Node.js 的内部调试器。
¥Use inspect to launch Node.js’ internal debugger.
所有这些选项都是互斥的。
¥All of these options are mutually exclusive.
意味着 --timeout 0。
¥Implies --timeout 0.
# --parallel, -p
自 v.8.0.0 起。
¥Since v.8.0.0.
使用 --parallel 标志在工作池中运行测试。
¥Use the --parallel flag to run tests in a worker pool.
每个测试文件将被放入队列中并在工作线程可用时执行。
¥Each test file will be put into a queue and executed as workers become available.
NOTICE:--parallel 对 Mocha 的行为有一定的影响,你必须意识到这一点。了解有关 并行运行测试 的更多信息。
¥NOTICE: --parallel has certain implications for Mocha’s behavior which you must be aware of. Read more about running tests in parallel.
# --jobs <count>, -j <count>
自 v.8.0.0 起。
¥Since v.8.0.0.
使用 --jobs <count> 指定工作池中的最大进程数。
¥Use --jobs <count> to specify the maximum number of processes in the worker pool.
默认值为 CPU 核心数减 1。
¥The default value is the number of CPU cores less 1.
暗示:使用 --jobs 0 或 --jobs 1 暂时禁用 --parallel。
¥Hint: Use --jobs 0 or --jobs 1 to temporarily disable --parallel.
除非与 --parallel 一起使用,否则无效。
¥Has no effect unless used with --parallel.
# 关于选项类型
¥About Option Types
在 v6.0.0 中更新。
¥Updated in v6.0.0.
Mocha 的 --help 输出中注释为 [boolean] 类型的每个标志都可以通过在标志名称前添加 --no- 来否定。例如,--no-color 将禁用 Mocha 的颜色输出,默认情况下启用。
¥Each flag annotated of type [boolean] in Mocha’s --help output can be negated by prepending --no- to the flag name. For example, --no-color will disable Mocha’s color output, which is enabled by default.
除非另有说明,所有布尔标志默认为 false。
¥Unless otherwise noted, all boolean flags default to false.
# 关于 node 标志
¥About node Flags
mocha 可执行文件支持 node 可执行文件支持的所有适用标志。
¥The mocha executable supports all applicable flags which the node executable supports.
这些标志根据你的 Node.js 版本而有所不同。
¥These flags vary depending on your version of Node.js.
node 标志可以在 Mocha 的 configuration 中定义。
¥node flags can be defined in Mocha’s configuration.
自 v9.1.0 起你还可以使用
--node-option将node标志传递给 Node.js。¥Since v9.1.0 You can also pass
nodeflags to Node.js using--node-option.
# --enable-source-maps
自 Node.js v12.12.0 起
¥Since Node.js v12.12.0
如果 --enable-source-maps 标志传递给 mocha,将收集源映射并用于为转译代码提供准确的堆栈跟踪:
¥If the --enable-source-maps flag
is passed to mocha, source maps will be collected and used to provide accurate stack traces for transpiled code:
Error: cool
    at Object.<anonymous> (/Users/fake-user/bigco/nodejs-tasks/build/src/index.js:27:7)
        -> /Users/fake-user/bigco/nodejs-tasks/src/index.ts:24:7
# 关于 V8 标志
¥About V8 Flags
将 --v8- 添加到 node --v8-options 的输出中列出的任何标志(不包括 --v8-options 本身)以使用它。
¥Prepend --v8- to any flag listed in the output of node --v8-options (excluding --v8-options itself) to use it.
V8 标志可以在 Mocha 的 configuration 中定义。
¥V8 flags can be defined in Mocha’s configuration.
自 v9.1.0 起你还可以使用
--node-option将 V8 标志(不带--v8-)传递给 Node.js。¥Since v9.1.0 You can also pass V8 flags (without
--v8-) to Node.js using--node-option.
# 并行测试
¥Parallel Tests
自 v.8.0.0 起。
¥Since v.8.0.0.
根据测试的数量和性质,并行运行测试(使用 --parallel 标志)时你可能会发现显着的性能优势。
¥Depending on the number and nature of your tests, you may find a significant performance benefit when running tests in parallel (using the --parallel flag).
对于许多用例来说,并行测试应该是开箱即用的。但是,你必须了解该行为的一些重要含义。
¥Parallel tests should work out-of-the box for many use cases. However, you must be aware of some important implications of the behavior.
注意:基于 Mocha 构建的第三方库的作者应该阅读本文!
¥Note: Authors of third-party libraries built on Mocha should read this!
# 报告器的局限性
¥Reporter Limitations
由于以下报告器的性质,它们在并行运行测试时无法工作:
¥Due to the nature of the following reporters, they cannot work when running tests in parallel:
这些报告器希望 Mocha 知道它计划在执行之前运行多少测试。此信息在并行模式下不可用,因为测试文件仅在即将运行时才加载。
¥These reporters expect Mocha to know how many tests it plans to run before execution. This information is unavailable in parallel mode, as test files are loaded only when they are about to be run.
在串行模式下,测试结果出现时将为 “stream”。在并行模式下,报告器输出被缓冲;每个文件完成后将进行报告。实际上,报告器输出将出现在 “chunks” 中(但在其他方面将是相同的)。如果测试文件特别慢,则在运行时可能会出现明显的暂停。
¥In serial mode, tests results will “stream” as they occur. In parallel mode, reporter output is buffered; reporting will occur after each file is completed. In practice, the reporter output will appear in “chunks” (but will otherwise be identical). If a test file is particularly slow, there may be a significant pause while it’s running.
# 不允许进行独家测试
¥Exclusive Tests are Disallowed
不能在并行模式下使用 it.only、describe.only、this.only() 等。这与上面提到的不兼容报告器的原因相同:在并行模式下,Mocha 在运行测试之前不会将所有文件和套件加载到内存中。
¥You cannot use it.only, describe.only, this.only(), etc., in parallel mode. This is for the same reason as the incompatible reporters noted above: in parallel mode, Mocha does not load all files and suites into memory before running tests.
建议的解决方法:
¥Suggested workarounds:
-
使用
--grep或--fgrep代替;它不是特别有效,但它会起作用。¥Use
--grepor--fgrepinstead; it’s not particularly efficient, but it will work. -
不要使用并行模式。你可能不会运行很多独占测试,因此无论如何你都看不到并行模式的巨大好处。
¥Don’t use parallel mode. Likely, you won’t be running very many exclusive tests, so you won’t see a great benefit from parallel mode anyhow.
提示:如果你的配置文件中定义了并行模式,你可以通过使用
--no-parallel标志或减少作业计数(例如--jobs=0)在命令行上临时禁用它。¥TIP: If parallel mode is defined in your config file, you can temporarily disable it on the command-line by using either the
--no-parallelflag or reducing the job count, e.g.,--jobs=0.
# 文件顺序是不确定的
¥File Order is Non-Deterministic
在并行模式下,Mocha 不保证测试文件的运行顺序,也不保证哪个工作进程运行它们。
¥In parallel mode, Mocha does not guarantee the order in which test files will run, nor which worker process runs them.
因此,以下取决于顺序的选项不能在并行模式下使用:
¥Because of this, the following options, which depend on order, cannot be used in parallel mode:
# 测试持续时间变异性
¥Test Duration Variability
以并行模式运行测试自然会使用更多的系统资源。根据系统负载,操作系统可能需要额外的时间来安排和完成某些操作。因此,单个测试的超时可能需要增加 globally 或 otherwise。
¥Running tests in parallel mode will naturally use more system resources. The OS may take extra time to schedule and complete some operations, depending on system load. For this reason, the timeouts of individual tests may need to be increased either globally or otherwise.
# “保释” 是 “最大努力”
¥"Bail" is “Best Effort”
当与 --bail(或 this.bail())一起使用在第一次失败后退出时,其他测试可能会同时运行。Mocha 在退出之前必须关闭其工作进程。
¥When used with --bail (or this.bail()) to exit after the first failure, it’s likely other tests will be running at the same time. Mocha must shut down its worker processes before exiting.
同样,子进程可能会抛出未捕获的异常。当与 --allow-uncaught 一起使用时,Mocha 会将 “bubble” 这个异常传递给主进程,但仍然必须关闭其进程。
¥Likewise, subprocesses may throw uncaught exceptions. When used with --allow-uncaught, Mocha will “bubble” this exception to the main process, but still must shut down its processes.
无论哪种方式,Mocha 都会中止测试运行 “很快。”
¥Either way, Mocha will abort the test run “very soon.”
# 根钩子不是全局的
¥Root Hooks Are Not Global
注意:这仅适用于以并行模式运行时。
¥NOTE: This only applies when running in parallel mode.
根钩子是测试文件中未在套件中定义的钩子。使用 bdd 接口的示例:
¥A root hook is a hook in a test file which is not defined within a suite. An example using the bdd interface:
// test/setup.js

// root hook to run before every test (even in other files)
beforeEach(function () {
  doMySetup();
});

// root hook to run after every test (even in other files)
afterEach(function () {
  doMyTeardown();
});
当通过以下命令运行时(在默认的 “serial” 模式下):
¥When run (in the default “serial” mode) via this command:
mocha --file "./test/setup.js" "./test/**/*.spec.js"
setup.js 将首先执行,并为 ./test/**/*.spec.js 中找到的每个测试安装上面显示的两个钩子。
¥setup.js will be executed first, and install the two hooks shown above for every test found in ./test/**/*.spec.js.
上面的例子在并行模式下不起作用。
¥The above example does not work in parallel mode.
当 Mocha 以并行模式运行时,测试文件不共享相同的进程,也不共享相同的 Mocha 实例。因此,测试文件 A 中定义的假设根钩子将不会出现在测试文件 B 中。
¥When Mocha runs in parallel mode, test files do not share the same process, nor do they share the same instance of Mocha. Consequently, a hypothetical root hook defined in test file A will not be present in test file B.
以下是一些建议的解决方法:
¥Here are a couple suggested workarounds:
-
require('./setup.js')或import './setup.js'位于每个测试文件的顶部。对于那些不喜欢样板的人最好避免使用。¥
require('./setup.js')orimport './setup.js'at the top of every test file. Best avoided for those averse to boilerplate. -
受到推崇的:使用新的(也是从 v8.0.0 开始)根钩子插件 系统在 “required” 文件中定义根钩子。
¥Recommended: Define root hooks in a “required” file, using the new (also as of v8.0.0) Root Hook Plugin system.
如果你需要运行某些代码一次且仅一次,请改用 全局夹具。
¥If you need to run some code once and only once, use a global fixture instead.
# 没有浏览器支持
¥No Browser Support
目前,并行模式仅在 Node.js 中可用。
¥Parallel mode is only available in Node.js, for now.
# 第三方报告者的有限报告者 API
¥Limited Reporter API for Third-Party Reporters
第三方报告者在尝试访问 Test、Suite 和 Hook 对象中不存在的属性时可能会遇到问题。如果第三方报告器不能在并行模式下工作(但可以在串行模式下工作),请 提出问题。
¥Third-party reporters may encounter issues when attempting to access non-existent properties within Test, Suite, and Hook objects. If a third-party reporter does not work in parallel mode (but otherwise works in serial mode), please file an issue.
# 并行模式故障排除
¥Troubleshooting Parallel Mode
如果你发现你的测试在使用 --parallel 运行时无法正常工作,请耸耸肩并继续,或者使用这个方便的清单来让事情正常工作:
¥If you find your tests don’t work properly when run with --parallel, either shrug and move on, or use this handy-dandy checklist to get things working:
-
✅确保你使用的是 支持报告器。
¥✅ Ensure you are using a supported reporter.
-
✅确保你没有使用 其他不支持的标志。
¥✅ Ensure you are not using other unsupported flags.
-
✅仔细检查你的 配置文件;配置文件中设置的选项将与任何命令行选项合并。
¥✅ Double-check your config file; options set in config files will be merged with any command-line option.
-
✅在测试中查找根钩子(它们看起来像 this)。将它们移至 根钩子插件 中。
¥✅ Look for root hooks (they look like this) in your tests. Move them into a Root Hook Plugin.
-
✅你正在使用的任何断言、模拟或其他测试库是否使用根钩子?它们可能需要是 migrated 才能与并行模式兼容。
¥✅ Do any assertion, mock, or other test libraries you’re consuming use root hooks? They may need to be migrated for compatibility with parallel mode.
-
✅如果测试意外超时,你可能需要增加默认测试超时(通过
--timeout)¥✅ If tests are unexpectedly timing out, you may need to increase the default test timeout (via
--timeout) -
✅确保你的测试不依赖于按特定顺序运行。
¥✅ Ensure your tests do not depend on being run in a specific order.
-
✅确保你的测试自行清理;删除临时文件、句柄、套接字等。不要尝试在测试文件之间共享状态或资源。
¥✅ Ensure your tests clean up after themselves; remove temp files, handles, sockets, etc. Don’t try to share state or resources between test files.
# 关于并行测试的注意事项
¥Caveats About Testing in Parallel
某些类型的测试不太适合并行运行。例如,对时间极其敏感的测试,或向有限资源池发送 I/O 请求的测试(例如打开端口、自动浏览器窗口、访问测试数据库或远程服务器等)。
¥Some types of tests are not so well-suited to run in parallel. For example, extremely timing-sensitive tests, or tests which make I/O requests to a limited pool of resources (such as opening ports, or automating browser windows, hitting a test DB, or remote server, etc.).
免费云 CI 服务可能无法为其构建代理提供合适的多核容器或 VM。关于 CI 的预期性能提升:你的旅费可能会改变。在 .mocharc.js 中使用条件来检查 process.env.CI 并适当调整作业计数可能会有所帮助。
¥Free-tier cloud CI services may not provide a suitable multi-core container or VM for their build agents. Regarding expected performance gains in CI: your mileage may vary. It may help to use a conditional in a .mocharc.js to check for process.env.CI, and adjust the job count as appropriate.
工作数 带来的性能提升不太可能(但并非不可能)超过可用 CPU 内核的数量。也就是说,要考虑一下工作数量 - 没有一刀切的方法,测试的独特特性将决定最佳的工作数量;甚至可能是越少越好!
¥It’s unlikely (but not impossible) to see a performance gain from a job count greater than the number of available CPU cores. That said, play around with the job count–there’s no one-size-fits all, and the unique characteristics of your tests will determine the optimal number of jobs; it may even be that fewer is faster!
# 并行模式工作 ID
¥Parallel Mode Worker IDs
自 v9.2.0 起
¥Since v9.2.0
并行模式启动的每个进程都被分配一个唯一的 ID,从 0(第一个启动的进程)到 N-1(第 N 个进程)。该工作线程 ID 可以在测试中通过环境变量 MOCHA_WORKER_ID 访问。例如,它可以用于为每个测试过程分配不同的数据库、服务端口等。
¥Each process launched by parallel mode is assigned a unique id, from 0 for the first process to be launched, to N-1 for the Nth process. This worker id may be accessed in tests via the environment variable MOCHA_WORKER_ID. It can be used for example to assign a different database, service port, etc for each test process.
# 根钩子插件
¥Root Hook Plugins
自 v8.0.0 起
¥Since v8.0.0
在某些情况下,你可能需要在每个文件中的每次测试之前(或之后)有一个 hook。这些称为根钩子。在 v8.0.0 之前,实现此目的的方法是结合使用 --file 和 root hooks(参见 上面的例子)。这在 v8.0.0 中仍然有效,但在并行模式下运行测试时不起作用!因此,强烈建议不要使用此方法运行 root hook,并且将来可能会弃用。
¥In some cases, you may want a hook before (or after) every test in every file. These are called root hooks. Previous to v8.0.0, the way to accomplish this was to use --file combined with root hooks (see example above). This still works in v8.0.0, but not when running tests in parallel mode! For that reason, running root hooks using this method is strongly discouraged, and may be deprecated in the future.
根钩子插件是一个通过 --require 加载的 JavaScript 文件,其中 “registers” 是一个或多个根钩子,可在所有测试文件中使用。
¥A Root Hook Plugin is a JavaScript file loaded via --require which “registers” one or more root hooks to be used across all test files.
在浏览器中,你可以直接通过 rootHooks 对象设置根钩子:mocha.setup({ rootHooks: {beforeEach() {...}} }),见 mocha.setup()
¥In browsers you can set root hooks directly via a rootHooks object: mocha.setup({ rootHooks: {beforeEach() {...}} }), see mocha.setup()
# 定义根钩子插件
¥Defining a Root Hook Plugin
Root Hook 插件文件是一个导出(通过 module.exports)mochaHooks 属性的脚本。它是通过 --require <file> 加载的。
¥A Root Hook Plugin file is a script which exports (via module.exports) a mochaHooks property. It is loaded via --require <file>.
这是一个定义根钩子的简单示例,使用 CJS 和 ESM 语法编写。
¥Here’s a simple example which defines a root hook, written using CJS and ESM syntax.
# 使用 CommonJS
¥With CommonJS
// test/hooks.js

exports.mochaHooks = {
  beforeEach(done) {
    // do something before every test
    done();
  }
};
# 带 ES 模块
¥With ES Modules
我们在这些示例中使用 .mjs 扩展。
¥We’re using the .mjs extension in these examples.
提示:如果你在使 ES 模块正常工作时遇到问题,请参阅 Node.js 文档。
¥Tip: If you’re having trouble getting ES modules to work, refer to the Node.js documentation.
// test/hooks.mjs

export const mochaHooks = {
  beforeEach(done) {
    // do something before every test
    done();
  }
};
注意:进一步的示例将使用 ESM 语法。
¥Note: Further examples will use ESM syntax.
# 可用的根钩子
¥Available Root Hooks
根钩子适用于任何接口,但属性名称不会更改。换句话说,如果你使用 tdd 接口,则 suiteSetup 映射到 beforeAll,setup 映射到 beforeEach。
¥Root hooks work with any interface, but the property names do not change. In other words, if you are using the tdd interface, suiteSetup maps to beforeAll, and setup maps to beforeEach.
可用的根钩子及其行为:
¥Available root hooks and their behavior:
-
beforeAll:-
在串行模式下(Mocha 的默认模式),在所有测试开始之前,仅执行一次
¥In serial mode (Mocha’s default), before all tests begin, once only
-
在并行模式下,在所有测试开始之前针对每个文件运行
¥In parallel mode, run before all tests begin, for each file
-
-
beforeEach:-
在两种模式下,在每次测试之前运行
¥In both modes, run before each test
-
-
afterAll:-
串行模式下,所有测试结束后运行,仅运行一次
¥In serial mode, run after all tests end, once only
-
在并行模式下,在所有测试结束后运行每个文件
¥In parallel mode, run after all tests end, for each file
-
-
afterEach:-
在两种模式下,每次测试后运行
¥In both modes, run after every test
-
提示:如果你需要确保代码在任何模式下运行一次且仅运行一次,请使用 全局夹具。
¥Tip: If you need to ensure code runs once and only once in any mode, use global fixtures.
与其他钩子一样,this 指的是当前上下文对象:
¥As with other hooks, this refers to the current context object:
// test/hooks.mjs

export const mochaHooks = {
  beforeAll() {
    // skip all tests for bob
    if (require('os').userInfo().username === 'bob') {
      return this.skip();
    }
  }
};
# 单个插件中的多个根钩子
¥Multiple Root Hooks in a Single Plugin
出于组织目的,可以在单个插件中定义多个根钩子。例如:
¥Multiple root hooks can be defined in a single plugin, for organizational purposes. For example:
// test/hooks.mjs

export const mochaHooks = {
  beforeEach: [
    function (done) {
      // do something before every test,
      // then run the next hook in this array
    },
    async function () {
      // async or Promise-returning functions allowed
    }
  ]
};
# Root Hook 插件可以导出函数
¥Root Hook Plugins Can Export a Function
如果你需要执行一些逻辑(例如根据环境有条件地选择根钩子),mochaHooks 可以是返回预期对象的函数。
¥If you need to perform some logic–such as choosing a root hook conditionally, based on the environment–mochaHooks can be a function which returns the expected object.
// test/hooks.mjs

export const mochaHooks = () => {
  if (process.env.CI) {
    // root hooks object
    return {
      beforeEach: [
        function () {
          // CI-specific beforeEach
        },
        function () {
          // some other CI-specific beforeEach
        }
      ]
    };
  }
  // root hooks object
  return {
    beforeEach() {
      // regular beforeEach
    }
  };
};
如果需要执行异步操作,mochaHooks 可以是 Promise 返回:
¥If you need to perform an async operation, mochaHooks can be Promise-returning:
// test/hooks.mjs

export const mochaHooks = async () => {
  const result = await checkSomething();
  // only use a root hook if `result` is truthy
  if (result) {
    // root hooks object
    return {
      beforeEach() {
        // something
      }
    };
  }
};
# 多个根钩子插件
¥Multiple Root Hook Plugins
多次使用 --require 可以注册多个 root hook 插件。例如,要在 hooks-a.js 和 hooks-b.js 中注册根钩子,请使用 --require hooks-a.js --require hooks-b.js。这些将按顺序注册(并运行)。
¥Multiple root hook plugins can be registered by using --require multiple times. For example, to register the root hooks in hooks-a.js and hooks-b.js, use --require hooks-a.js --require hooks-b.js. These will be registered (and run) in order.
# 迁移测试以使用 Root Hook 插件
¥Migrating Tests to use Root Hook Plugins
要将使用根钩子的测试迁移到根钩子插件:
¥To migrate your tests using root hooks to a root hook plugin:
-
找到你的根钩子(在套件外部定义的钩子 - 通常是
describe()回调)。¥Find your root hooks (hooks defined outside of a suite–usually
describe()callback). -
创建一个新文件,例如
test/hooks.js。¥Create a new file, e.g.,
test/hooks.js. -
将根钩子移至
test/hooks.js。¥Move your root hooks into
test/hooks.js. -
在
test/hooks.js中,使你的钩子成为导出的mochaHooks属性的成员。¥In
test/hooks.js, make your hooks a member of an exportedmochaHooksproperty. -
运行测试时使用
--require test/hooks.js(更好:使用 配置文件 和{"require": "test/hooks.js"})。¥Use
--require test/hooks.js(even better: use a config file with{"require": "test/hooks.js"}) when running your tests.
例如,给定以下文件 test/test.spec.js,其中包含根钩子:
¥For example, given the following file, test/test.spec.js, containing root hooks:
// test/test.spec.js

beforeEach(function () {
  // global setup for all tests
});

after(function () {
  // one-time final cleanup
});

describe('my test suite', function () {
  it('should have run my global setup', function () {
    // make assertion
  });
});
你的 test/hooks.js(在本例中为 CJS 模块)应包含:
¥Your test/hooks.js (for this example, a CJS module) should contain:
// test/hooks.js

exports.mochaHooks = {
  beforeEach: function () {
    // global setup for all tests
  },
  afterAll: function () {
    // one-time final cleanup
  }
};
注意:小心!
after变为afterAll,before变为beforeAll。¥NOTE: Careful!
afterbecomesafterAllandbeforebecomesbeforeAll.
你原来的 test/test.spec.js 现在应该包含:
¥Your original test/test.spec.js should now contain:
// test/test.spec.js

describe('my test suite', function () {
  it('should have run my global setup', function () {
    // make assertion
  });
});
运行 mocha --require test/hooks.js test/test.spec.js 将像以前一样运行(现在可以与 --parallel 一起使用)。
¥Running mocha --require test/hooks.js test/test.spec.js will run as before (and is now ready to be used with --parallel).
# 迁移库以使用 Root Hook 插件
¥Migrating a Library to use Root Hook PLugins
如果你是库维护者,并且你的库使用根钩子,则可以通过重构入口点来迁移:
¥If you’re a library maintainer, and your library uses root hooks, you can migrate by refactoring your entry point:
-
你的库应始终导出
mochaHooks对象。¥Your library should always export a
mochaHooksobject. -
为了保持向后兼容性,当且仅当
global.beforeEach(或其他相关钩子)存在时才运行根钩子。¥To maintain backwards compatibility, run your root hooks if and only if
global.beforeEach(or other relevant hook) exists. -
指导你的用户在运行
mocha时执行--require <your-package>。¥Instruct your users to
--require <your-package>when runningmocha.
# 全局夹具
¥Global Fixtures
自 v8.2.0 起
¥Since v8.2.0
乍一看,全局夹具似乎与 根钩子 相似。然而,与根钩子不同的是,全局夹具:
¥At first glance, global fixtures seem similar to root hooks. However, unlike root hooks, global fixtures:
-
保证执行一次且仅执行一次
¥Are guaranteed to execute once and only once
-
并行模式、监视模式和串行模式的工作方式相同
¥Work identically parallel mode, watch mode, and serial mode
-
不要与测试、套件或其他钩子共享上下文
¥Do not share a context with tests, suites, or other hooks
¥There are two types of global fixtures: global setup fixtures and global teardown fixtures.
# 全局设置夹具
¥Global Setup Fixtures
要创建全局设置装置,请从脚本导出 mochaGlobalSetup,例如:
¥To create a global setup fixture, export mochaGlobalSetup from a script, e.g.,:
// fixtures.cjs

// can be async or not
exports.mochaGlobalSetup = async function () {
  this.server = await startSomeServer({port: process.env.TEST_PORT});
  console.log(`server running on port ${this.server.port}`);
};
…或 ES 模块:
¥…or an ES module:
// fixtures.mjs

// can be async or not
export async function mochaGlobalSetup() {
  this.server = await startSomeServer({port: process.env.TEST_PORT});
  console.log(`server running on port ${this.server.port}`);
}
要使用它,请在通过 mocha --require fixtures.cjs(或你为该文件命名的任何名称)运行 Mocha 时加载此文件。
¥To use it, load this file when running Mocha via mocha --require fixtures.cjs (or whatever you have named the file).
记住:你可以在 配置文件 中定义 “requires”。
¥Remember: you can define “requires” in a configuration file.
现在,在 Mocha 加载并运行测试之前,它将执行上述全局设置装置,启动服务器进行测试。然而,当 Mocha 完成后,这不会关闭服务器!为此,请使用 全局拆解夹具。
¥Now, before Mocha loads and runs your tests, it will execute the above global setup fixture, starting a server for testing. This won’t shut down the server when Mocha is done, however! To do that, use a global teardown fixture.
# 全局拆解夹具
¥Global Teardown Fixtures
就像 全局设置夹具 一样,可以通过从 “required” 脚本导出来创建全局拆卸装置(我们可以将两种类型的装置放在一个文件中):
¥Just like a global setup fixture, a global teardown fixture can be created by exporting from a “required” script (we can put both types of fixtures in a single file):
// fixtures.cjs, cont'd

// can be async or not
exports.mochaGlobalTeardown = async function () {
  await this.server.stop();
  console.log('server stopped!');
};
…或 ES 模块:
¥…or an ES module:
// fixtures.mjs, cont'd

// can be async or not
export async function mochaGlobalTeardown() {
  await this.server.stop();
  console.log('server stopped!');
}
你会注意到我们在夹具示例中使用了 this。全局设置装置和全局拆卸装置共享一个上下文,这意味着我们可以向设置装置中的上下文对象(this)添加属性,并稍后在拆卸装置中引用它们。当装置位于单独的文件中时,这更有用,因为你可以只使用 JS 的变量作用域规则(下面的例子)。
¥You’ll note that we used this in the fixture examples. Global setup fixtures and global teardown fixtures share a context, which means we can add properties to the context object (this) in the setup fixture, and reference them later in the teardown fixture. This is more useful when the fixtures are in separate files, since you can just use JS’ variable scoping rules instead (example below).
正如 above 和 以下 所解释的,测试文件无权访问此上下文对象。
¥As explained above–and below–test files do not have access to this context object.
# 何时使用全局赛程
¥When To Use Global Fixtures
全局装置非常适合启动服务器、打开套接字或以其他方式创建测试将通过 I/O 重复访问的资源。
¥Global fixtures are good for spinning up a server, opening a socket, or otherwise creating a resource that your tests will repeatedly access via I/O.
# 何时不使用全局装置
¥When Not To Use Global Fixtures
如果你需要访问内存中的值(例如文件句柄或数据库连接),请不要使用全局装置来执行此操作,因为你的测试将无法访问该值。
¥If you need to access an in-memory value (such as a file handle or database connection), don’t use global fixtures to do this, because your tests will not have access to the value.
你可以聪明地尝试通过向
global对象分配一些内容来绕过此限制,但这在并行模式下不起作用。遵守规则可能是最好的选择!¥You could be clever and try to get around this restriction by assigning something to the
globalobject, but this will not work in parallel mode. It’s probably best to play by the rules!
相反,使用全局夹具启动数据库,并使用 根钩子插件 或普通 ol’ hooks 创建连接。
¥Instead, use the global fixture to start the database, and use root hook plugins or plain ol’ hooks to create a connection.
下面是使用全局夹具和 “首先” 钩子来完成工作的示例。请注意,我们在测试中的任何地方都没有引用 server 对象!
¥Here’s an example of using global fixtures and “before all” hooks to get the job done. Note that we do not reference the server object anywhere in our tests!
首先,使用全局夹具来启动和停止测试服务器:
¥First, use a global fixture to start and stop a test server:
// fixtures.mjs

let server;

export const mochaGlobalSetup = async () => {
  server = await startSomeServer({port: process.env.TEST_PORT});
  console.log(`server running on port ${server.port}`);
};

export const mochaGlobalTeardown = async () => {
  await server.stop();
  console.log('server stopped!');
};
然后,在测试中连接到服务器:
¥Then, connect to the server in your tests:
// test.spec.mjs

import {connect} from 'my-server-connector-thingy';

describe('my API', function () {
  let connection;

  before(async function () {
    connection = await connect({port: process.env.TEST_PORT});
  });

  it('should be a nice API', function () {
    // assertions here
  });

  after(async function () {
    return connection.close();
  });
});
最后,使用此命令将其组合在一起:mocha --require fixtures.mjs test.spec.mjs。
¥Finally, use this command to bring it together: mocha --require fixtures.mjs test.spec.mjs.
# 测试夹具决策树向导事物
¥Test Fixture Decision-Tree Wizard Thing
此流程图将帮助你决定应使用 hooks、根钩子插件 或 全局夹具 中的哪一个。
¥This flowchart will help you decide which of hooks, root hook plugins or global fixtures you should use.
# 接口
¥Interfaces
Mocha 的 “interface” 系统允许开发者选择他们的 DSL 风格。Mocha 具有 BDD、TDD、Exports、QUnit 和 Require 风格的接口。
¥Mocha’s “interface” system allows developers to choose their style of DSL. Mocha has BDD, TDD, Exports, QUnit and Require-style interfaces.
# BDD
BDD 接口提供 describe()、context()、it()、specify()、before()、after()、beforeEach() 和 afterEach()。
¥The BDD interface provides describe(), context(), it(), specify(), before(), after(), beforeEach(), and afterEach().
context() 只是 describe() 的别名,其行为方式相同;它提供了一种使测试更易于阅读和组织的方法。同样,specify() 是 it() 的别名。
¥context() is just an alias for describe(), and behaves the same way; it provides a way to keep tests easier to read and organized. Similarly, specify() is an alias for it().
前面的所有示例都是使用 BDD 接口编写的。
¥All of the previous examples were written using the BDD interface.
describe('Array', function () {
  before(function () {
    // ...
  });

  describe('#indexOf()', function () {
    context('when not present', function () {
      it('should not throw an error', function () {
        (function () {
          [1, 2, 3].indexOf(4);
        }).should.not.throw();
      });
      it('should return -1', function () {
        [1, 2, 3].indexOf(4).should.equal(-1);
      });
    });
    context('when present', function () {
      it('should return the index where the element first appears in the array', function () {
        [1, 2, 3].indexOf(3).should.equal(2);
      });
    });
  });
});
# TDD
TDD 接口提供 suite()、test()、suiteSetup()、suiteTeardown()、setup()、teardown():
¥The TDD interface provides suite(), test(), suiteSetup(), suiteTeardown(), setup(), and teardown():
suite('Array', function () {
  setup(function () {
    // ...
  });

  suite('#indexOf()', function () {
    test('should return -1 when not present', function () {
      assert.equal(-1, [1, 2, 3].indexOf(4));
    });
  });
});
# 导出
¥Exports
Exports 接口允许以模块化方式组织测试。它在较大的项目中特别有用,因为测试套件可以分割成不同的文件。
¥The Exports interface allows for organizing tests in a modular fashion. It is particularly useful in larger projects where test suites can be segmented into different files.
注意:浏览器环境不支持 Exports 接口。出现此限制是因为浏览器处理模块导出的方式与 Node.js 不同。如果你打算在浏览器中运行测试,请考虑使用完全受支持的 BDD 或 TDD 接口。
¥Note: The Exports interface is not supported in browser environments. This limitation arises because browsers handle module exports differently from Node.js. If you intend to run tests in a browser, consider using the BDD or TDD interfaces, which are fully supported.
Exports 界面很像 Mocha 的前身 expresso。键 before、after、beforeEach 和 afterEach 是特殊情况,对象值是套件,函数值是测试用例:
¥The Exports interface is much like Mocha’s predecessor expresso. The keys before, after, beforeEach, and afterEach are special-cased, object values are suites, and function values are test-cases:
module.exports = {
  before: function () {
    // ...
  },

  Array: {
    '#indexOf()': {
      'should return -1 when not present': function () {
        [1, 2, 3].indexOf(4).should.equal(-1);
      }
    }
  }
};
# QUnit
受 QUnit 启发的界面与 QUnit 的 “flat” 外观相匹配,其中测试套件标题在测试用例之前定义。与 TDD 一样,它使用 suite() 和 test(),但与 BDD 类似,它也包含 before()、after()、beforeEach() 和 afterEach()。
¥The QUnit-inspired interface matches the “flat” look of QUnit, where the test suite title is defined before the test-cases. Like TDD, it uses suite() and test(), but resembling BDD, it also contains before(), after(), beforeEach(), and afterEach().
function ok(expr, msg) {
  if (!expr) throw new Error(msg);
}

suite('Array');

test('#length', function () {
  var arr = [1, 2, 3];
  ok(arr.length == 3);
});

test('#indexOf()', function () {
  var arr = [1, 2, 3];
  ok(arr.indexOf(1) == 0);
  ok(arr.indexOf(2) == 1);
  ok(arr.indexOf(3) == 2);
});

suite('String');

test('#length', function () {
  ok('foo'.length == 3);
});
# 要求
¥Require
require 接口允许你直接使用 require 请求 describe 和朋友词,并随意调用它们。如果你想在测试中避免全局变量,此接口也很有用。
¥The require interface allows you to require the describe and friend words directly using require and call them whatever you want. This interface is also useful if you want to avoid global variables in your tests.
注意:require 接口无法通过 node 可执行文件运行,必须通过 mocha 运行。
¥Note: The require interface cannot be run via the node executable, and must be run via mocha.
var testCase = require('mocha').describe;
var pre = require('mocha').before;
var assertions = require('mocha').it;
var assert = require('chai').assert;

testCase('Array', function () {
  pre(function () {
    // ...
  });

  testCase('#indexOf()', function () {
    assertions('should return -1 when not present', function () {
      assert.equal([1, 2, 3].indexOf(4), -1);
    });
  });
});
# 报告器
¥Reporters
Mocha 报告器会根据终端窗口进行调整,并在 stdio 流未与 TTY 关联时始终禁用 ANSI 转义着色。
¥Mocha reporters adjust to the terminal window, and always disable ANSI-escape coloring when the stdio streams are not associated with a TTY.
# 规范
¥Spec
别名:Spec、spec
¥Alias: Spec, spec
这是默认报告者。Spec 报告器输出一个与测试用例一样嵌套的分层视图。
¥This is the default reporter. The Spec reporter outputs a hierarchical view nested just as the test cases are.
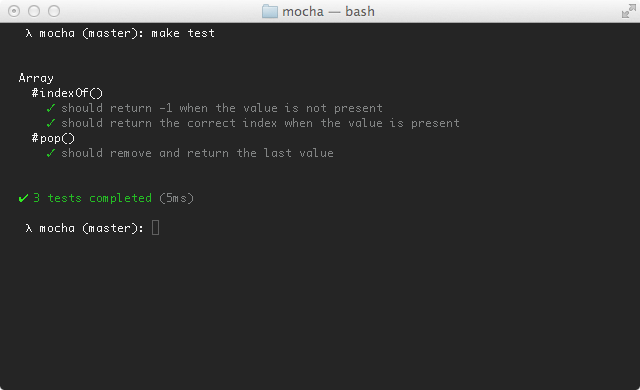
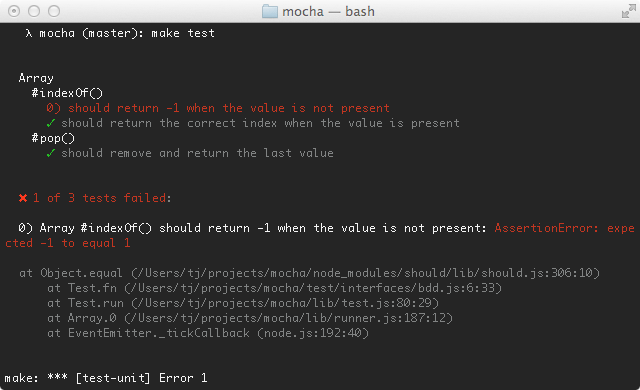
# 点阵
¥Dot Matrix
别名:Dot、dot
¥Alias: Dot, dot
点阵报告器是代表测试用例的一系列字符。失败以红色感叹号 (!) 高亮,待处理测试以蓝色逗号 (,) 高亮,缓慢测试以黄色高亮。如果你喜欢最小输出,那就太好了。
¥The Dot Matrix reporter is a series of characters which represent test cases. Failures highlight in red exclamation marks (!), pending tests with a blue comma (,), and slow tests as yellow. Good if you prefer minimal output.
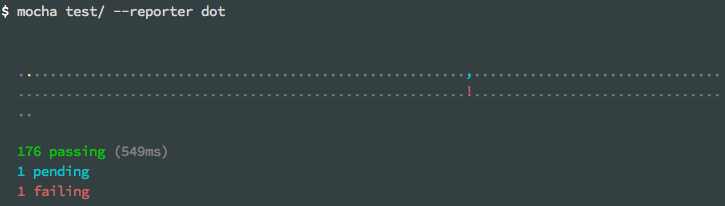
# 尼亚
¥Nyan
别名:Nyan、nyan
¥Alias: Nyan, nyan
Nyan 报告器正是你所期望的那样:
¥The Nyan reporter is exactly what you might expect:
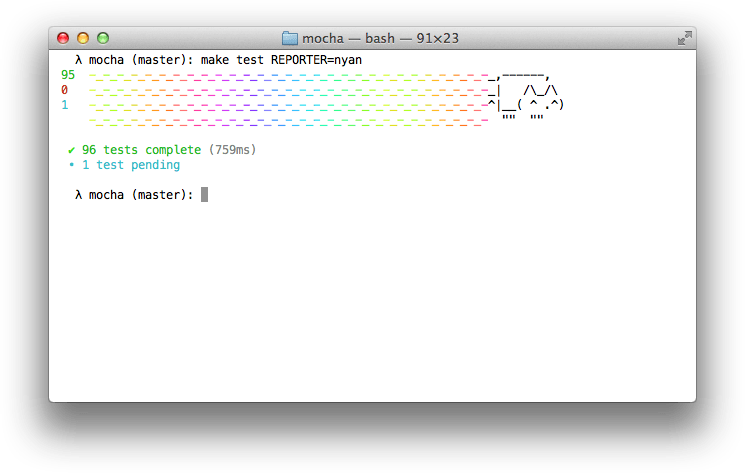
# TAP
别名:TAP、tap
¥Alias: TAP, tap
TAP 报告器为 测试任何协议 消费者触发了行。
¥The TAP reporter emits lines for a Test-Anything-Protocol consumer.
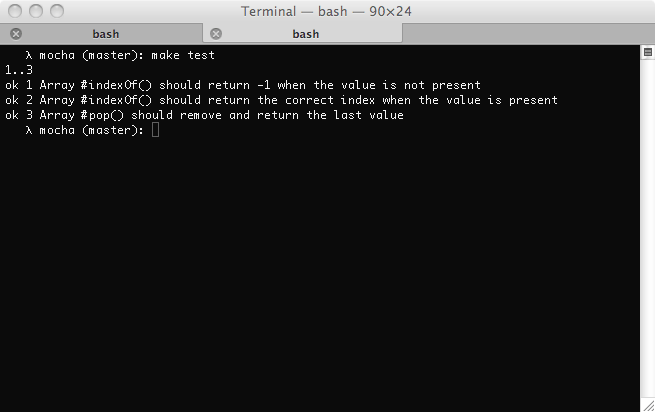
# 降落跑道
¥Landing Strip
别名:Landing、landing
¥Alias: Landing, landing
着陆带报告器是一个模仿飞机着陆的花哨测试报告器:) unicode ftw
¥The Landing Strip reporter is a gimmicky test reporter simulating a plane landing 😃 unicode ftw
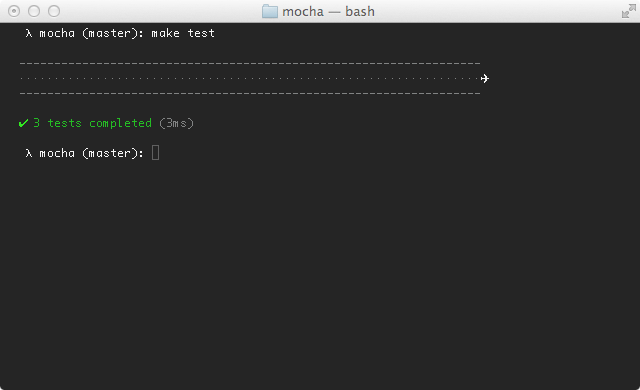
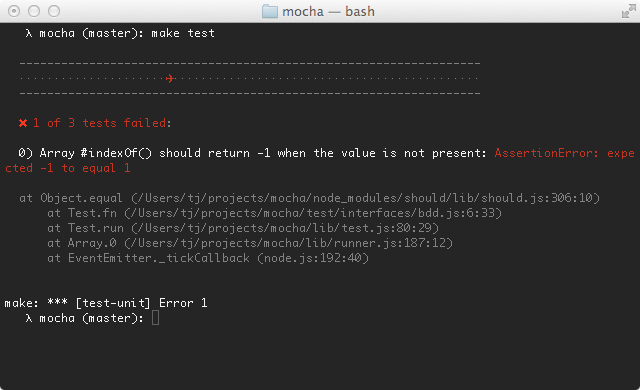
# 列表
¥List
别名:List、list
¥Alias: List, list
当测试用例通过或失败时,列表报告器会输出一个简单的规范列表,并在输出的底部输出失败的详细信息。
¥The List reporter outputs a simple specifications list as test cases pass or fail, outputting the failure details at the bottom of the output.
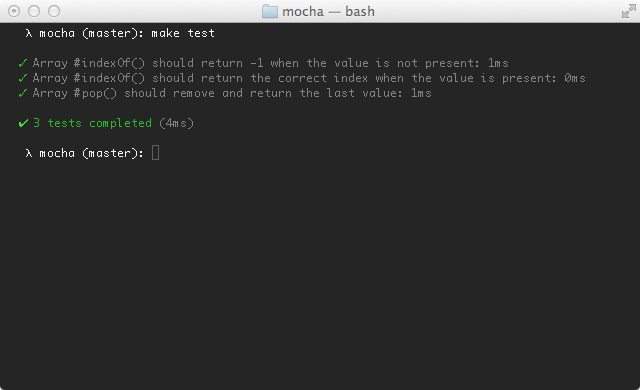
# 进步
¥Progress
别名:Progress、progress
¥Alias: Progress, progress
进度报告器实现了一个简单的进度条:
¥The Progress reporter implements a simple progress-bar:
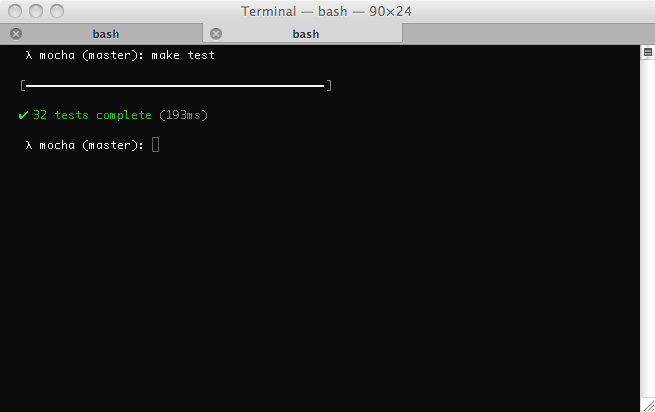
# JSON
别名:JSON、json
¥Alias: JSON, json
当测试完成(失败与否)时,JSON 报告器会输出一个大型 JSON 对象。
¥The JSON reporter outputs a single large JSON object when the tests have completed (failures or not).
默认情况下,它会输出到控制台。要直接写入文件,请使用 --reporter-option output=filename.json。
¥By default, it will output to the console. To write directly to a file, use --reporter-option output=filename.json.
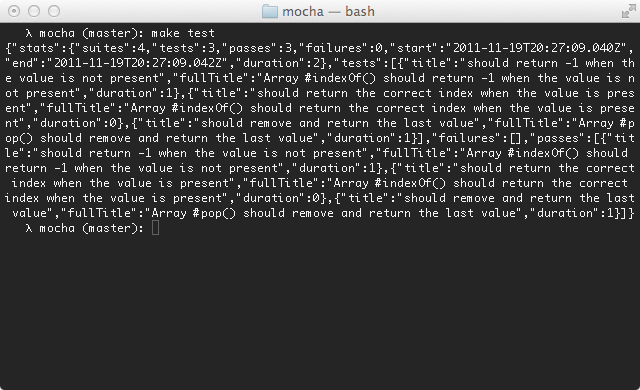
# JSON 流
¥JSON Stream
别名:JSONStream、json-stream
¥Alias: JSONStream, json-stream
JSON Stream 报告器在发生时输出以换行符分隔的 JSON “events”,以 “start” 事件开始,然后是测试通过或失败,然后是最终的 “end” 事件。
¥The JSON Stream reporter outputs newline-delimited JSON “events” as they occur, beginning with a “start” event, followed by test passes or failures, and then the final “end” event.
# 最小
¥Min
别名:Min、min
¥Alias: Min, min
Min 报告器仅显示摘要,同时在失败时仍输出错误。该报告器与 --watch 配合得很好,因为它可以清除终端,以便将测试摘要保留在顶部。
¥The Min reporter displays the summary only, while still outputting errors on failure. This reporter works great with --watch as it clears the terminal in order to keep your test summary at the top.

# 文档
¥Doc
别名:Doc、doc
¥Alias: Doc, doc
Doc 报告器输出测试的分层 HTML 正文表示。用页眉、页脚和一些样式封装它,然后你就拥有了一些很棒的文档!
¥The Doc reporter outputs a hierarchical HTML body representation of your tests. Wrap it with a header, footer, and some styling, then you have some fantastic documentation!
例如,假设你有以下 JavaScript:
¥For example, suppose you have the following JavaScript:
describe('Array', function () {
  describe('#indexOf()', function () {
    it('should return -1 when the value is not present', function () {
      [1, 2, 3].indexOf(5).should.equal(-1);
      [1, 2, 3].indexOf(0).should.equal(-1);
    });
  });
});
命令 mocha --reporter doc array 将产生:
¥The command mocha --reporter doc array would yield:
<section class="suite">
  <h1>Array</h1>
  <dl>
    <section class="suite">
      <h1>#indexOf()</h1>
      <dl>
        <dt>should return -1 when the value is not present</dt>
        <dd>
          <pre><code>[1,2,3].indexOf(5).should.equal(-1);
[1,2,3].indexOf(0).should.equal(-1);</code></pre>
        </dd>
      </dl>
    </section>
  </dl>
</section>
SuperAgent 请求库 测试文档 是由 Mocha 的文档报告器使用以下 Bash 命令生成的:
¥The SuperAgent request library test documentation was generated with Mocha’s doc reporter using this Bash command:
$ mocha --reporter=doc | cat docs/head.html - docs/tail.html > docs/test.html
查看 SuperAgent 的 生成文件 以供参考。
¥View SuperAgent’s Makefile for reference.
# Markdown
别名:Markdown、markdown
¥Alias: Markdown, markdown
Markdown 报告器为你的测试套件生成 Markdown TOC 和正文。如果你想将测试用作 Github wiki 页面中的文档,或者使用 Github 可以渲染的存储库中的 Markdown 文件,那么这非常有用。例如,这里是 Connect 测试输出。
¥The Markdown reporter generates a markdown TOC and body for your test suite. This is great if you want to use the tests as documentation within a Github wiki page, or a markdown file in the repository that Github can render. For example, here is the Connect test output.
# XUnit
别名:XUnit、xunit
¥Alias: XUnit, xunit
XUnit 报告器也可用。它输出与 XUnit 兼容的 XML 文档,通常适用于 CI 服务器。
¥The XUnit reporter is also available. It outputs an XUnit-compatible XML document, often applicable in CI servers.
默认情况下,它会输出到控制台。要直接写入文件,请使用 --reporter-option output=filename.xml。
¥By default, it will output to the console. To write directly to a file, use --reporter-option output=filename.xml.
要指定自定义报告标题,请使用 --reporter-option suiteName="Custom name"。
¥To specify custom report title, use --reporter-option suiteName="Custom name".
报告器默认显示绝对文件路径。要显示相对路径,请使用 --reporter-option showRelativePaths。
¥The reporter shows absolute file paths by default. To show relative paths instead, use --reporter-option showRelativePaths.
# 第三方报告器
¥Third-Party Reporters
Mocha 允许你定义自定义报告器。欲了解更多信息,请参阅 wiki。
¥Mocha allows you to define custom reporters. For more information see the wiki.
示例:
¥Examples:
-
¥the TeamCity reporter
-
我们的 工作示例
¥our working example
# HTML 报告器
¥HTML Reporter
别名:HTML、html
¥Alias: HTML, html
HTML 报告器不适合在命令行上使用。
¥The HTML reporter is not intended for use on the command-line.
# Node.JS 原生 ESM 支持
¥Node.JS native ESM support
自 v7.1.0 起
¥Since v7.1.0
Mocha 支持将测试编写为 ES 模块,而不仅仅是使用 CommonJS。例如:
¥Mocha supports writing your tests as ES modules, and not just using CommonJS. For example:
// test.mjs
import {add} from './add.mjs';
import assert from 'assert';

it('should add to numbers from an es module', () => {
  assert.equal(add(3, 5), 8);
});
要启用此功能,你无需执行任何特殊操作。将测试文件编写为 ES 模块。在 Node.js 中,这意味着以 .mjs 扩展名结束文件,或者,如果你想使用常规 .js 扩展名,则将 "type": "module" 添加到 package.json 中。更多信息可以在 Node.js 文档 中找到。
¥To enable this you don’t need to do anything special. Write your test file as an ES module. In Node.js
this means either ending the file with a .mjs extension, or, if you want to use the regular .js extension, by
adding "type": "module" to your package.json.
More information can be found in the Node.js documentation.
# 目前的限制
¥Current Limitations
-
监视模式 不支持 ES 模块测试文件
¥Watch mode does not support ES Module test files
-
¥Custom reporters and custom interfaces can only be CommonJS files
-
配置文件 只能是 CommonJS 文件(
.mocharc.js或.mocharc.cjs)¥Configuration file can only be a CommonJS file (
.mocharc.jsor.mocharc.cjs) -
当通过
proxyquire、rewiremock或rewire等库使用模块级模拟时,请不要在测试文件中使用 ES 模块。你可以切换到使用testdouble,它支持 ESM。¥When using module-level mocks via libs like
proxyquire,rewiremockorrewire, hold off on using ES modules for your test files. You can switch to usingtestdouble, which does support ESM.
# 在浏览器中运行 Mocha
¥Running Mocha in the Browser
Mocha 在浏览器中运行。Mocha 的每个版本都会有新版本的 ./mocha.js 和 ./mocha.css 用于浏览器。
¥Mocha runs in the browser. Every release of Mocha will have new builds of ./mocha.js and ./mocha.css for use in the browser.
典型的设置可能如下所示,我们在加载测试脚本之前调用 mocha.setup('bdd') 使用 BDD 接口,并使用 mocha.run() 运行它们。
¥A typical setup might look something like the following, where we call mocha.setup('bdd') to use the BDD interface before loading the test scripts, running them onload with mocha.run().
<!DOCTYPE html>
<html lang="en">
  <head>
    <meta charset="utf-8" />
    <title>Mocha Tests</title>
    <meta name="viewport" content="width=device-width, initial-scale=1.0" />
    <link rel="stylesheet" href="https://unpkg.com/mocha/mocha.css" />
  </head>
  <body>
    <div id="mocha"></div>

    <script src="https://unpkg.com/chai@4/chai.js"></script>
    <script src="https://unpkg.com/mocha/mocha.js"></script>

    <script class="mocha-init">
      mocha.setup('bdd');
      mocha.checkLeaks();
    </script>
    <script src="test.array.js"></script>
    <script src="test.object.js"></script>
    <script src="test.xhr.js"></script>
    <script class="mocha-exec">
      mocha.run();
    </script>
  </body>
</html>
Mocha 支持其支持的 Node.js 主版本发布时可用的最新主流浏览器版本。从 Mocha v11.0.0 开始,包括以下浏览器版本,这些浏览器版本在 2022 年 4 月 19 日 Node.js 18.10.0 发布时处于稳定状态:
¥Mocha supports the latest major versions of evergreen browsers available when Mocha’s oldest supported Node.js major version was released. As of Mocha v11.0.0, that includes the following browser versions that were stable as of Node.js 18.10.0’s release on April 19, 2022:
# 格雷普
¥Grep
浏览器可以使用 --grep 作为功能。将查询字符串附加到你的 URL:?grep=api。
¥The browser may use the --grep as functionality. Append a query-string to your URL: ?grep=api.
# 浏览器配置
¥Browser Configuration
Mocha 选项可以通过 mocha.setup() 设置。示例:
¥Mocha options can be set via mocha.setup(). Examples:
// Use "tdd" interface.  This is a shortcut to setting the interface;
// any other options must be passed via an object.
mocha.setup('tdd');

// This is equivalent to the above.
mocha.setup({
  ui: 'tdd'
});

// Examples of options:
mocha.setup({
  allowUncaught: true,
  asyncOnly: true,
  bail: true,
  checkLeaks: true,
  dryRun: true,
  failZero: true,
  forbidOnly: true,
  forbidPending: true,
  global: ['MyLib'],
  retries: 3,
  rootHooks: { beforeEach(done) { ... done();} },
  slow: '100',
  timeout: '2000',
  ui: 'bdd'
});
# 浏览器特定选项
¥Browser-specific Option(s)
Mocha 浏览器支持很多,但不是全部 命令行选项。要使用包含 “*” 的 命令行选项,请将选项转换为驼峰式大小写(例如 check-leaks 到 checkLeaks)。
¥Browser Mocha supports many, but not all cli options.
To use a cli option that contains a “-”, please convert the option to camel-case, (eg. check-leaks to checkLeaks).
# 与 命令行选项 略有不同的选项:
¥Options that differ slightly from cli options:
reporter {string|constructor} 你可以传递报告者的名称或自定义报告者的构造函数。你可以找到浏览器 此处 的推荐报告器。也可以使用 内置报告器。不推荐也不支持在浏览器中使用它们,打开控制台查看测试结果。
¥reporter {string|constructor}
You can pass a reporter’s name or a custom reporter’s constructor. You can find recommended reporters for the browser here. It is possible to use built-in reporters as well. Their employment in browsers is neither recommended nor supported, open the console to see the test results.
# 仅在浏览器上下文中起作用的选项:
¥Options that only function in browser context:
noHighlighting {boolean} 如果设置为 true,请勿尝试在输出测试代码上使用语法高亮。
¥noHighlighting {boolean}
If set to true, do not attempt to use syntax highlighting on output test code.
# 报告
¥Reporting
HTML 报告器是在浏览器中运行 Mocha 时的默认报告器。它看起来像这样:
¥The HTML reporter is the default reporter when running Mocha in the browser. It looks like this:
Mocha 威萨姆 是默认 HTML 报告器的绝佳替代品。
¥Mochawesome is a great alternative to the default HTML reporter.
# 配置 Mocha (Node.js)
¥Configuring Mocha (Node.js)
自 v6.0.0 起
¥Since v6.0.0
Mocha 支持多种格式的配置文件(典型的现代命令行工具):
¥Mocha supports configuration files, typical of modern command-line tools, in several formats:
-
JavaScript:在项目的根目录中创建
.mocharc.js(或.mocharc.cjs,当在package.json中使用"type"="module"时),并导出包含你的配置的对象 (module.exports = {/* ... */})。¥JavaScript: Create a
.mocharc.js(or.mocharc.cjswhen using"type"="module"in yourpackage.json) in your project’s root directory, and export an object (module.exports = {/* ... */}) containing your configuration. -
YAML:在项目的根目录中创建
.mocharc.yaml(或.mocharc.yml)。¥YAML: Create a
.mocharc.yaml(or.mocharc.yml) in your project’s root directory. -
JSON:在项目的根目录中创建
.mocharc.json(或.mocharc.jsonc)。此文件中允许注释(虽然不是有效的 JSON),但会被 Mocha 忽略。¥JSON: Create a
.mocharc.json(or.mocharc.jsonc) in your project’s root directory. Comments — while not valid JSON — are allowed in this file, and will be ignored by Mocha. -
package.json:在项目的
package.json中创建mocha属性。¥package.json: Create a
mochaproperty in your project’spackage.json.
# 自定义位置
¥Custom Locations
你可以使用 --config <path> 选项为配置文件指定自定义位置。Mocha 将使用文件的扩展名来确定如何解析文件,如果未知,则将假定为 JSON。
¥You can specify a custom location for your configuration file with the --config <path> option. Mocha will use the file’s extension to determine how to parse the file, and will assume JSON if unknown.
你还可以使用 --package <path> 选项指定自定义 package.json 位置。
¥You can specify a custom package.json location as well, using the --package <path> option.
# 忽略配置文件
¥Ignoring Config Files
要跳过查找配置文件,请使用 --no-config。同样,使用 --no-package 阻止 Mocha 在 package.json 中查找配置。
¥To skip looking for config files, use --no-config. Likewise, use --no-package to stop Mocha from looking for configuration in a package.json.
# 优先事项
¥Priorities
如果没有给出自定义路径,并且同一目录中有多个配置文件,Mocha 将只搜索并使用一个。优先级是:
¥If no custom path was given, and if there are multiple configuration files in the same directory, Mocha will search for — and use — only one. The priority is:
.mocharc.js.mocharc.yaml.mocharc.yml.mocharc.jsonc.mocharc.json
# 环境变量
¥Environment Variables
MOCHA_OPTIONS 环境变量可用于指定命令行参数。这些参数优先于配置文件中的参数。
¥The MOCHA_OPTIONS environment variable may be used to specify command line arguments. These arguments take priority over those found in configuration files.
例如,设置 bail 和 retries 选项:
¥For example, setting the bail and retries options:
$ MOCHA_OPTIONS="--bail --retries 3" mocha
# 合并
¥Merging
Mocha 还将把 package.json 中找到的任何选项合并到其运行时配置中。如果发生冲突,优先顺序是:
¥Mocha will also merge any options found in package.json into its run-time configuration. In case of conflict, the priority is:
-
在命令行上指定的参数
¥Arguments specified on command-line
-
MOCHA_OPTIONS环境变量中指定的参数。¥Arguments specified in
MOCHA_OPTIONSenvironment variable. -
配置文件(
.mocharc.js、.mocharc.yml等)¥Configuration file (
.mocharc.js,.mocharc.yml, etc.) -
package.json的mocha属性¥
mochaproperty ofpackage.json
可以安全重复的选项(例如,--require)将被连接起来,优先级较高的配置源将出现在列表中较早的位置。例如,包含 "require": "bar" 的 .mocharc.json,再加上 mocha --require foo 的执行,将导致 Mocha 按顺序需要 foo,然后是 bar。
¥Options which can safely be repeated (e.g., --require) will be concatenated, with higher-priority configuration sources appearing earlier in the list. For example, a .mocharc.json containing "require": "bar", coupled with execution of mocha --require foo, would cause Mocha to require foo, then bar, in that order.
# 扩展配置
¥Extending Configuration
配置可以使用 extends 关键字从其他模块继承。请参阅 此处 了解更多信息。
¥Configurations can inherit from other modules using the extends keyword. See here for more information.
# 配置格式
¥Configuration Format
-
任何 “boolean” 标志(不需要参数,例如
--bail)都可以使用布尔值指定,例如:"bail": true。¥Any “boolean” flag (which doesn’t require a parameter, such as
--bail), can be specified using a boolean value, e.g.:"bail": true. -
任何 “array” 类型选项(有关列表,请参阅
mocha --help)都可以是单个字符串值。¥Any “array”-type option (see
mocha --helpfor a list) can be a single string value. -
对于包含破折号 (
-) 的选项,可以使用驼峰命名法指定选项名称。¥For options containing a dash (
-), the option name can be specified using camelCase. -
别名是有效的名称,例如
R而不是reporter。¥Aliases are valid names, e.g.,
Rinstead ofreporter. -
测试文件可以使用
spec指定,例如"spec": "test/**/*.spec.js"。¥Test files can be specified using
spec, e.g.,"spec": "test/**/*.spec.js". -
配置文件中还支持
node标志。请谨慎使用,因为这些内容可能因 Node.js 版本而异!¥Flags to
nodeare also supported in configuration files. Use caution, as these can vary between versions of Node.js!
更多配置示例请参见 GitHub 上的 example/config 目录。
¥For more configuration examples, see the example/config directory on GitHub.
# test/ 目录
¥The test/ Directory
默认情况下,mocha 查找 glob "./test/*.{js,cjs,mjs}",因此你可能希望将测试放在 test/ 文件夹中。如果要包含子目录,请传递 --recursive 选项。
¥By default, mocha looks for the glob "./test/*.{js,cjs,mjs}", so you may want to put
your tests in test/ folder. If you want to include subdirectories, pass the
--recursive option.
要配置 mocha 寻找测试的位置,你可以传递你自己的 glob:
¥To configure where mocha looks for tests, you may pass your own glob:
$ mocha --recursive "./spec/*.js"
某些 shell 通过使用 globstar (**) 通配符支持递归匹配。Bash >= 4.3 通过 globstar 选项 和 必须启用 支持此选项,以获得与传递 --recursive 选项相同的结果(ZSH 和 Fish 默认支持此选项)。启用递归匹配后,以下内容与传递 --recursive 相同:
¥Some shells support recursive matching by using the globstar (**) wildcard. Bash >= 4.3 supports this with the globstar option which must be enabled to get the same results as passing the --recursive option (ZSH and Fish support this by default). With recursive matching enabled, the following is the same as passing --recursive:
$ mocha "./spec/**/*.js"
你应该始终在 npm 脚本中引用你的 glob。如果使用引号,node-glob 模块将处理其扩展。为了获得最大兼容性,请用双引号将整个表达式括起来,并在表达式中避免使用 $、"、^ 和 \。
¥You should always quote your globs in npm scripts. If you
use quotes, the node-glob module will
handle its expansion. For maximum compatibility,
surround the entire expression with double quotes and refrain
from $, ", ^, and \ within your expression.
请参阅 tutorial 关于使用 glob 的内容。
¥See this tutorial on using globs.
注意:为了可移植性,建议使用双引号。
¥Note: Double quotes around the glob are recommended for portability.
# 错误代码
¥Error Codes
自 v6.0.0 起
¥Since v6.0.0
当 Mocha 本身抛出异常时,关联的 Error 将具有 code 属性。在适用的情况下,消费者应检查 code 属性,而不是针对 message 属性进行字符串匹配。下表描述了这些错误代码:
¥When Mocha itself throws exception, the associated Error will have a code property. Where applicable, consumers should check the code property instead of string-matching against the message property. The following table describes these error codes:
| 代码 | 描述 |
|---|---|
ERR_MOCHA_INVALID_ARG_TYPE |
给定参数传递了错误的类型 |
ERR_MOCHA_INVALID_ARG_VALUE |
为给定参数传递了无效或不受支持的值 |
ERR_MOCHA_INVALID_EXCEPTION |
抛出错误或其他未指定的异常 |
ERR_MOCHA_INVALID_INTERFACE |
未找到选项中指定的接口 |
ERR_MOCHA_INVALID_REPORTER |
未找到选项中指定的报告者 |
ERR_MOCHA_NO_FILES_MATCH_PATTERN |
找不到测试文件 |
ERR_MOCHA_UNSUPPORTED |
请求的行为、选项或参数不受支持 |
# 编辑器插件
¥Editor Plugins
以下与编辑器相关的包可用:
¥The following editor-related packages are available:
# TextMate
Mocha TextMate 打包包 包含一些片段,可以使编写测试更快、更愉快。
¥The Mocha TextMate bundle includes snippets to make writing tests quicker and more enjoyable.
# JetBrains
JetBrains 为其 IDE 套件(IntelliJ IDEA、WebStorm 等)提供了 NodeJS 插件,其中包含 Mocha 测试运行程序等。
¥JetBrains provides a NodeJS plugin for its suite of IDEs (IntelliJ IDEA, WebStorm, etc.), which contains a Mocha test runner, among other things.
该插件名为 NodeJS,可以通过“首选项”>“插件”安装,前提是你的许可证允许。
¥The plugin is titled NodeJS, and can be installed via Preferences > Plugins, assuming your license allows it.
# Wallaby.js
Wallaby.js 是一款持续测试工具,可以使用 VS Code、Atom、JetBrains IDE(IntelliJ IDEA、WebStorm 等)、Sublime Text 和 Visual Studio 中的任何断言库对浏览器和 Node.js 项目进行 Mocha 的实时代码覆盖 。
¥Wallaby.js is a continuous testing tool that enables real-time code coverage for Mocha with any assertion library in VS Code, Atom, JetBrains IDEs (IntelliJ IDEA, WebStorm, etc.), Sublime Text and Visual Studio for both browser and node.js projects.
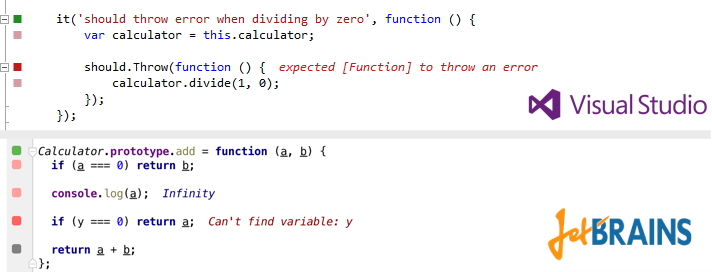
# Emacs
通过第 3 方包 mocha.el 可以获得对运行 Mocha 测试的 Emacs 支持。该软件包在 MELPA 上可用,并且可以通过 M-x package-install mocha 安装。
¥Emacs support for running Mocha tests is available via a 3rd party package mocha.el. The package is available on MELPA, and can be installed via M-x package-install mocha.
# Mocha 侧边栏(VS Code)
¥Mocha Sidebar (VS Code)
Mocha 侧边栏 是 VS Code 最完整的 mocha 扩展。
¥Mocha sidebar is the most complete mocha extension for vs code.
# 特性
¥Features
-
查看 VS Code 侧边栏菜单中的所有测试
¥see all tests in VS Code sidebar menu
-
为每个级别层次结构运行和调试测试,从所有测试到单个测试(以及每个套件)
¥run & debug tests for each level hierarchy from all tests to a single test (and each suite)
-
文件保存时自动运行测试
¥auto run tests on file save
-
直接在代码编辑器中查看测试结果
¥see tests results directly in the code editor
# 示例
¥Examples
真实的示例代码:
¥Real live example code:
# 测试 Mocha
¥Testing Mocha
要运行 Mocha 的测试,你需要 GNU Make 或兼容版本;Cygwin 应该可以工作。
¥To run Mocha’s tests, you will need GNU Make or compatible; Cygwin should work.
$ cd /path/to/mocha
$ npm install
$ npm test
# 更多信息
¥More Information
除了在 我们的 Discord 上与我们聊天之外,有关使用间谍、模拟和共享行为等其他信息,请务必查看 GitHub 上的 Mocha 维基。有关 Mocha 的运行示例,请查看 example/tests.html。对于 JavaScript API,请查看 API 文档 或 source。
¥In addition to chatting with us on our Discord, for additional information such as using spies, mocking, and shared behaviours be sure to check out the Mocha Wiki on GitHub. For a running example of Mocha, view example/tests.html. For the JavaScript API, view the API documentation or the source.